In recent years, we have seen a revolution in creativity, design and home manufacturing thanks to the introduction of affordable 3D printers Trusted Source 3D printing - Wikipedia 3D printing, or additive manufacturing, is the construction of a three-dimensional object from a CAD model or a digital 3D model. The term “3D printing” can refer to a variety of processes in which material is deposited, joined or solidified under computer control to create a three-dimensional object, with material being added together (such as plastics, liquids or powder grains being fused together), typically layer by layer. en.wikipedia.org . When you get involved in 3D printing it can open up a new world of opportunities, but there are some challenges to overcome. At times, you may need to deal with prints that don’t seem to work, filaments that are messy, a misbehaving extruder assemble and more. Many of these problems can be fixed with a little head scratching and the solutions are beyond the scope of this particular article. Instead, we are going to focus on a single common problem and show you how to clean a 3D printer nozzle.
 Even if you choose the best 3D printer nozzles on the market they can still clog if you don’t take care of them. It’s important to understand that you can take steps to prevent this situation and avoid cleaning the extruder nozzle and assembly. Adopting a proactive approach will ensure that you limit downtime and boost your productivity. Let’s take a look at four simple tasks that will reduce the chance of a clog developing.
Even if you’re using the best tpu filament you can afford it can become clogged. The most common reason for a nozzle or extruder jam is a piece of leftover filament that is lodged in the nozzle when the filament is changed. When you pull out a filament it’s virtually impossible to remove all the material if you just replace it with a new filament. But, you will find that it’s far easier if you remove the unwanted material because this prevents the formation of a plug when more filament is pushed through.
If you focus solely on cleaning the 3D printer nozzle, you can still experience clogging. This is because the filament needs to be clean too, any dust or dirt will be burned as it comes into contact with hot nozzle. Most manufacturers supply filament that’s cleaned to a high standard to avoid this issue, but dust and dirt can accumulate on filament that’s stored badly. The best way to store your filament is in vacuum sealed bags with some desiccant packets to remove any remaining moisture.
The height between the build platform and the nozzle is important if you want to avoid clogging. If the nozzle is set too high you will notice premature filament cooling accompanied by poor bed adhesion. If the nozzle is set too low, you will notice retrograde extrusion where the filament cannot flow correctly. Setting the nozzle too high or too low will affect the quality of your printing and retrograde extrusion will jam the nozzle.
If you’re new to 3D printing, you may have noticed the emphasis placed on printing temperatures in your 3D Printing for Dummies book. Even pros will understand the importance of selecting the right printing temperature and how it can affect the printing quality. Most 3D printers have a nozzle that is smaller than the filament diameter. So, the filament must be melted full or it cannot pass through the nozzle smoothly. If you set the temperature too low, it will be difficult for the extruder to pass the filament. This will cause the filament to cool before or inside the nozzle which is a bad jam to clean.
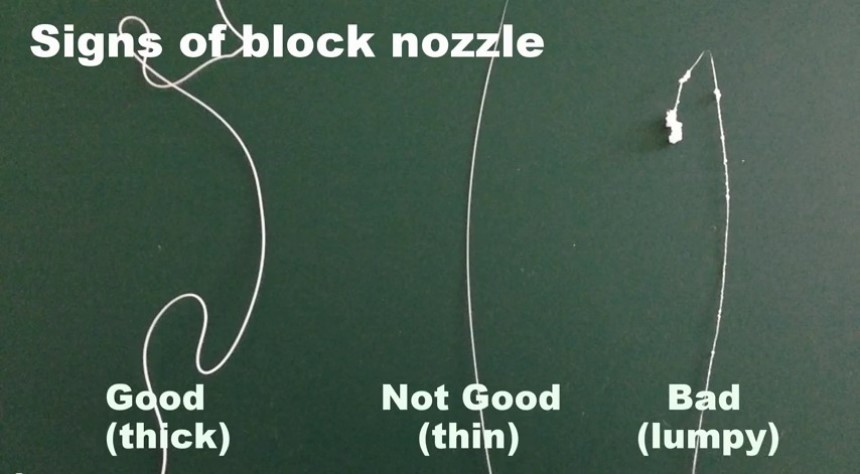
Before you look any further into how to clean a filament nozzle in your 3D printer, it’s important to establish that this is the problem that you’re dealing with. There are times when the filament breaks at the printer head entrance due to pressure from the gear that feeds the material. It’s also possible that you have a faulty heating block which isn’t heating the filament to the correct temperature to print. Once you’ve eliminated these two possible issues it’s likely that you have a clogged nozzle that required cleaning.
 Before we show you how to clean a clogged 3D printer nozzle you need to gather a few items, they are:
There are four main steps to follow if you’re looking for the best way to clean your 3D printer nozzle. But, nozzle jams can vary in severity, if you have a minor clog you may be able to clear it with the first step alone. However, a really bad jam may require you to go through each of the four steps in order to clear it entirely. Essentially, these steps progressively go from the simplest fix to the most complex.
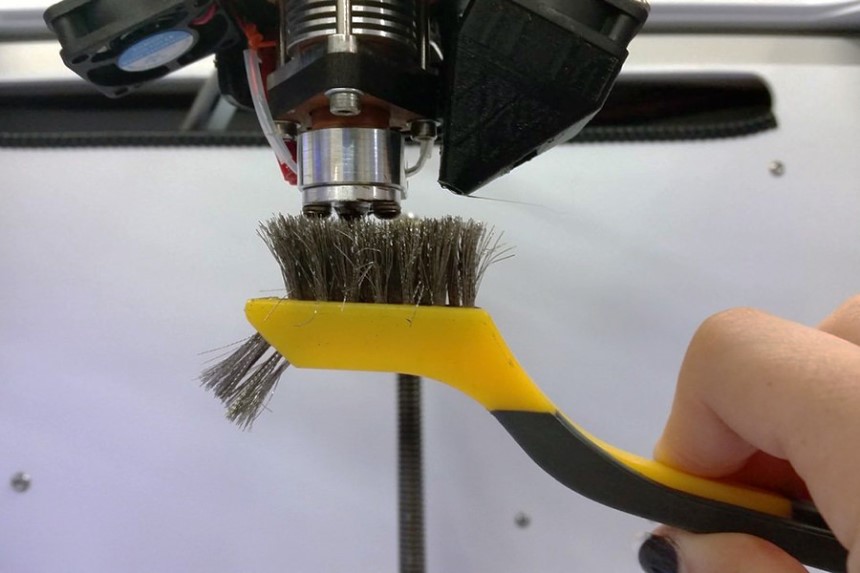 This is the easiest method if you’re wondering how to clean the outside of a 3D printer nozzle. Simply brush the nozzle with a wire brush to clear the tip and this may clear any minor clogs. In fact, this method is so easy that it’s a good idea to do it regularly as part of your maintenance routine. You need a wire brush because burnt material that has accumulated at the tip of the nozzle can be hard to remove. But, you cannot be too vigorous with your brushing because you can easily damage the nozzle.
Choose a brass wire brush because it will be effective but it’s less likely to cause damage when compared to steel wire alternatives.
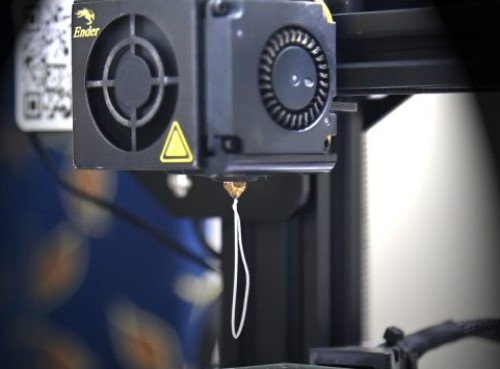
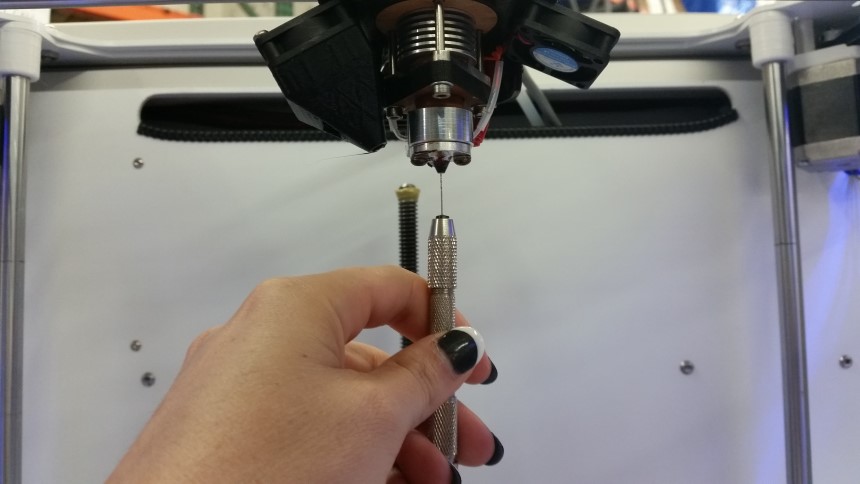
You could choose the best 3D printer for architects and have your printing halted with a small clog in the nozzle tip. This tiny piece of melted filament material can be pushed out of the nozzle tip with a sewing needle or a narrow pin. But, you will need to heat up the nozzle first to get the material softer and it will be easier to remove. To do this you can try to use the hot end assembly and if that doesn’t work use a hot air gun. Removing the jam with a needle requires a little patience and dexterity but this method works well with smaller clogs.
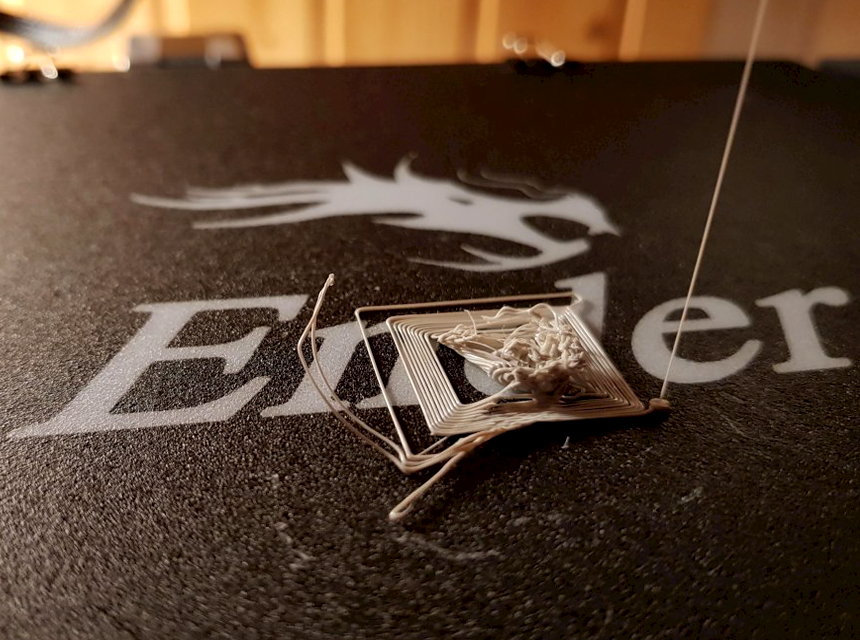
 This is a harder and yet reliable way to remove a clog caused by a large quantity of melted filament material. The “cold pull” method uses another length of nylon filament that is required because it has a higher melting point. Another good option is ABS, if you don’t have any nylon filament on hand. Dismantle the extruder setup and manually push the nylon filament through the nozzle and heat it up to 250ºC. Let the heating continue for around 5 minutes and push the nylon filament through the nozzle. Be firm, but gentle and you may start to see the clogged melted material being extruded along the length of the nylon filament. Continue this process until you can’t see any of that older melted filament running along the length of the nylon filament.
At this stage, you need to let the nozzle cool down; it needs to be at room temperature to ensure that the nylon filament has become solid again. Now you can heat up the nozzle to 120-130ºC which is hot enough to soften the filament to pull it free. You should notice that the shape of the inner part of your nozzle has made an impression on the end of the nylon filament. It’s also normal to see any pieces of loose material that were not removed during the initial part of the “cold pull” clearing.
If you’re lucky this method will work first time, but if you’re struggling to clear the clog it can be repeated multiple times.
If you’ve noticed that it’s very hard to pull the nylon filament clear you can increase the temperature settings on the next “cold pull”.
This is the final resort if you’ve tried every other method detailed above. This is an effective way to clean a clog, but it does take time and the results may vary depending on the filament material you’re trying to remove. Remove the clogged nozzle with a socket wrench and soak it in acetone for at least 15 minutes to dissolve the material. When the material is removed, wipe the nozzle clean of any remaining acetone and allow it to fully dry before you replace it in the extruder assembly. If the clog was caused by ABS it will not dissolve in acetone and you will need to melt it free with a heat gun. Get the nozzle hot, take a thin piece of soft wire and work a hole into the nozzle as you clean the material away. This is a time-consuming process, but it will work if you’re patient and methodical.
If you’re wondering how often you need to clean a nozzle on a CR-10 3D printer or other model this is a hard question to answer. After all, a printer nozzle will work well as long as it isn’t worn out or damaged. Most nozzles are durable parts, they can undergo a lot of heavy-duty work with high temperatures and they typically last for as long as you need them. Many people use their 3D printers in different ways, if you’re a dedicated hobbyist using the best 3D printer for cosplay purposes you may be using it less than a business. The general rule is that if you use your 3D printer a lot you will need to clean the nozzle more frequently.
When there is a buildup of pressure inside the nozzle it often causes the filament to be stripped away by the extruder hobs. This may mean that you have extruder gears that are affected as well as a jammed nozzle to deal with. This will be easy to see when you remove the filament because you will notice sections that appear to ground away.
If this occurs, you will have to clean the extruder hobs too because they are likely to be filled with melted material. If you don’t clean these gears they will not be able to grab at the filament to pull it and extrude it at your desired printing speed. This will result in poor printing results and the problem will only get worse over time.
Take apart the extruder assembly to gain access to the hobbed gear unit. This will be a tricky process. You need to take care, take pictures if you need to because it will be hard to put everything back together again. Be aware that this may invalidate any remaining warrant on your 3D printer before you attempt this fix. If you choose to process, you can clean the extruder gear hobs by poking at the lodged material with a pointed tool. Many people have success at this stage with wooden toothpicks which are small enough and less likely to cause damage.
When you’re new to the exciting world of 3D printing, it’s easy to ignore or be ignorant of some of the potential pitfalls. But, once you’ve been printing for a while you will start to notice that this fascinating hobby or business does have a few challenges that you need to overcome. It’s probably true to say that a clogged nozzle is one of the most time consuming and annoying problems that pros and amateurs encounter. A simple check of social media and forum posts on 3D printing will turn up accounts by people that spent hours clearing a stubborn nozzle jam.
Hopefully, we’ve demonstrated in this article that prevention is better than the cure. Instead of focusing on how to clean a 3D printer nozzle after a clog it’s a better idea to avoid one altogether. Regular exterior nozzle cleaning with stiff brass brush will help you keep the nozzle clean and minimize downtime issues. Always change the nozzle between filament changes and you will find that your 3D printing projects go smoothly. If you do have a nozzle jam follow the four steps above in order and that should fix the problem.