3D printing has undergone a lot of development since the early days of its popularity in the 1980s (especially in the types of 3D printers available), and it is not difficult to see why; the process always had tremendous upside and guaranteed satisfactory results, but the precision and consistency generated over time have made the results even more dependable.
However, when the model(s) to be printed are very complex and consist of many twisting or overarching components, it could get tricky. This potential for trickiness, combined with the fact that Cura 3D printing slicers are arguably the most popular options available, makes the need for knowledge on Cura support patterns very important. Lack of knowledge of these support patterns and the accompanying difficulty in calibrating the support settings would mean some inconsistency in the quality of the models that are printed. Thankfully though, we are here to inform your 3D printing and solve such problems.
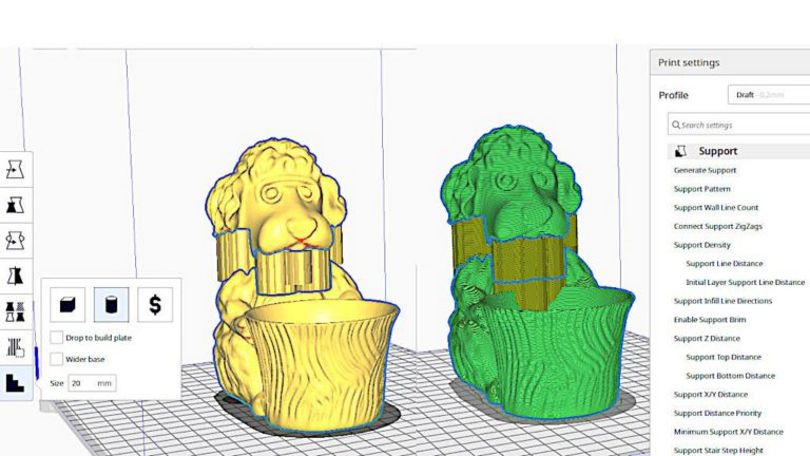
We have established that support settings are crucial in 3D printing, most notably the support settings associated with the Cura software due to its popularity. However, what do these support settings mean, and what are their specific functions?
Generally speaking, support settings are the settings of the slicing software that determine details like where supports are to be located or needed, the density of the supports that would be used, how the supports are to be spaced from each other, etc. These settings would be even more important as the complexity of the model to be printed increases and may even be affected by the type of material used in the 3D printer. For example, ABS 3D printers might require support settings more suited to the characteristic of their printing material.
Normally, the Cura slicers are usually designed and rolled out in such a way that their default settings in many of the available areas are good enough to allow for quality printing. Thanks to this, the need to adjust the support settings would only come into play in situations where the printing of more advanced models or the presence of a complicated problem is encountered.
There are a variety of problems or considerations that could necessitate the adjustment of support settings. One of the most popular of these is the density of the support(s) to be used. This is more specifically referred to as the support interface density and is important in determining the densities at the top or the bottom of the supports to be used.
Such a setting comes in handy in ensuring that the supports used could easily be removed after the model is printed. A lower support interface density would allow for the support to be removed with less fuss. In comparison, a higher support interface density would make it more difficult to remove the support. Other settings can also affect the ease with which supports can be removed after printing, and these will be touched upon later.
 As we implied earlier, not all the support settings present in the Cura slicer would need to be adjusted. Not all the settings would be available depending on where the visibility view of the software has been set to. This visibility view setting considers the skill level of a user and determines the appropriate level of control. For instance, the support settings available when the visibility view is set to advance would differ from those available at expert. The visibility view can be set to four levels which are the basic, advanced, expert, or custom selection level.
Some of the support settings available to a user of the Cura software is:
All of the above settings would be available if the visibility view is set to advance. However, changing the visibility view to an expert would involve the presence of even more settings for users to alter or tweak. One of such settings is the enable surface interface that would allow users to adjust the layer of material directly immediately to the support. Others may include:
We have given you a general rundown of the available support settings associated with the Cura slicer. As we earlier stated, though, there are many more settings that might be visible to users, and if the model to be printed is a simple one, some of the support settings could be left on default.
Nevertheless, if you are looking to get the best support settings for your printing out of the Cura and you have the skill and know-how, the following settings could be used to optimize your support structure:
Other support settings can be tweaked, but these are best left untouched if your model is not advanced enough to warrant their adjustment or if you lack the skill to set them properly. Many of these support settings may have a part to play in how long 3D printing takes.
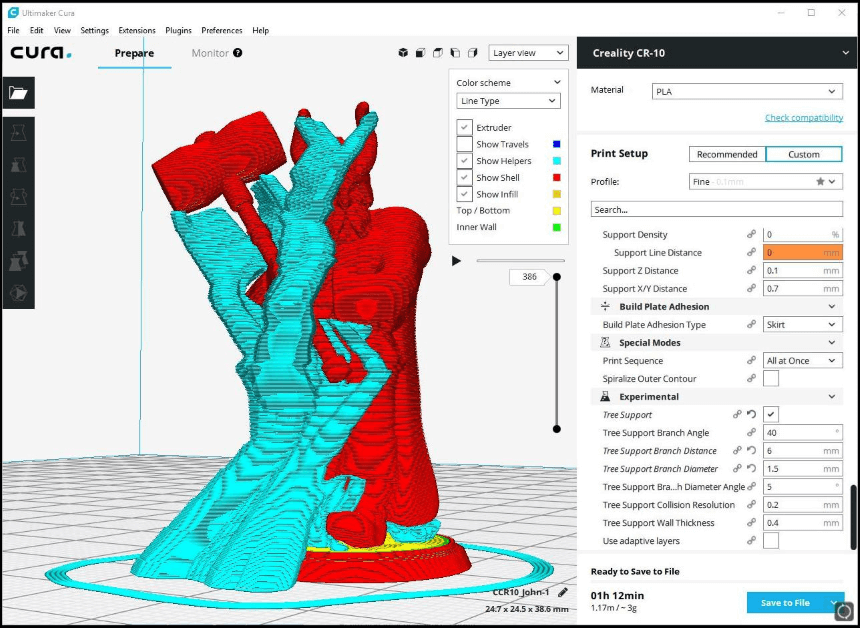
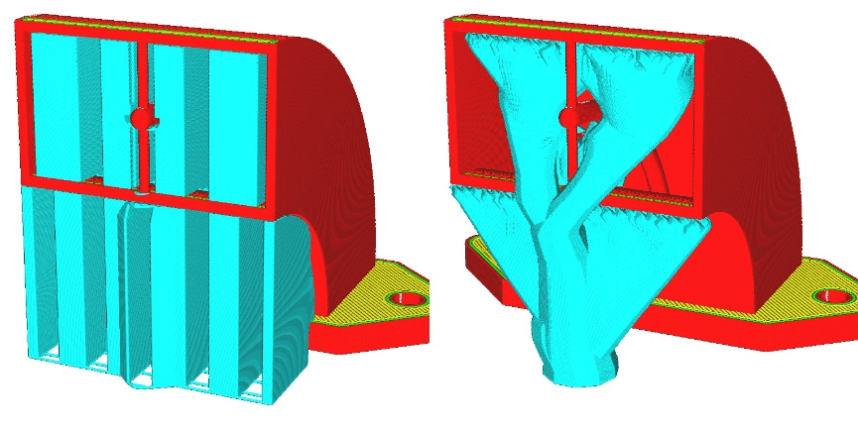 The support structure setting is the setting in the Cura that determines the technique to be used in creating the supports. The two techniques (and the two types of support structures) selected from are the normal and the tree supports.
The technique selected depends on the simplicity of the models to be printed. For instance, a simple model with standard overhangs can be printed using the normal support structure settings. In contrast, complicated models with many overhangs or delicate overhangs are best created using the tree support technique.
As such, it can be said that there is no best support structure setting, and though the tree supports can be used for both complicated and simple models, it should be unnecessary in simple models because the normal supports would work just as effectively. It should also be noted that the default setting for the support structure is usually normal.
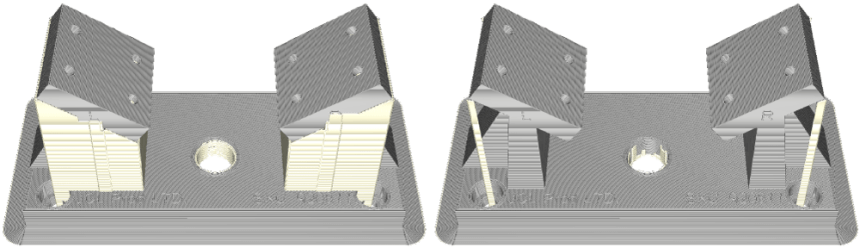 As earlier stated, the support placement indicates where the support structures created are to be placed during the printing of a model. This setting lows for the selection of one of two choices. The first of the choices is the “everywhere” setting that directs the placement of support structures everywhere, while the second is a “touching build plate” setting.
This touching build plate setting would allow for the production and placement of supports only for parts of the model where the support has a direct path to the printer’s build plate. As such, no part of the model being printed must be between the parts to be supported and the build plates.
It should be noted that when the everywhere setting is used, the support will be produced everywhere regardless of the complexity of the model (and in line with all of the other support settings that have been selected). This would indicate that even a highly complex model with many twists and turns will be printed with supports everywhere. Such an occurrence might present a complication when the supports are to be removed or could even affect the integrity of the model that will be printed out.
 The Default support overhang setting for the Cura software is 45°. One thing to note about the overhang angle setting is that the lower the angle that is set, the more the number of supports that are created. On the other hand, the higher the value of the setting, the lesser the number of supports created.
If the support overhang angle is set to 0, every possible overhang support will be created, while if the support overhang angle is set to 90°, no support would be created. The suitability of the support overhang angle setting to be used would depend on the calibration and performance of the 3D printer the setting is being placed for.
Because of this, many printing experts and long-term hobbyists recommended a support overhang angle of about 50°. However, in all honesty, the best support overhang angle setting for your 3D printing can only be determined by experience, and 45° degrees would be an excellent place to start as it represents the midpoint of the setting.
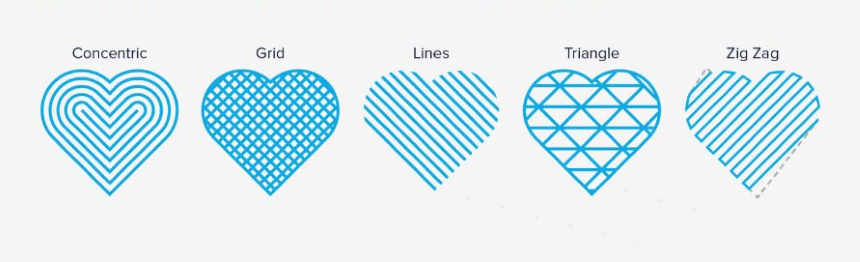
When it comes to supporting patterns, there are many options to choose from in the Cura, and depending on the model to be printed, specific options would be more suitable than others. That said, the pattern chosen for the support would affect the stability/strength of the support, the speed with which it could be set up (and, consequently, speed of printing), and the ease with which the support could be removed after printing. The available support patterns within the Cura are:
 To further explain the function of the support density setting that was given earlier, the support density can also be said to indicate the rates at which support structures are filled with material. As a result, when the support density setting is high, the support structure will be filled up faster, and the material within will be held closer to each other, thus, making it denser. When the support density setting is lower, the fill material will be filled in less quickly, allowing for more space between lines of material and making the supports less dense.
Support density can also be linked to the ease with which the supports can be removed after printing and the type of support pattern that would be selected. For instance, denser support for supporting overhangs would prevent sagging but would also be more difficult to remove, while less dense support might cause a little bit of sagging but would be easier to remove. Experimentation and experience would help users better determine or decide on the most appropriate density setting.
The effect of the support density setting on the support pattern has also been speculated upon. This is because certain patterns provide more stability and more contact. For example, a 20% support density in the lines support pattern would provide less overall density and strength than the 20% support density in a gyroid support pattern.
It should also be noted that the higher support density setting would require more material to be used in creating the support and consequently more time to be spent printing. This will make the gyroid pattern in the above example a better fit if the strength of the support and speed of printing is the most important considerations. In summary, the default setting for the support density in the Cura is usually 20%, and many experts feel that this is a suitable setting to use in printing.
 The support distance can be most easily described as the distance between the tops or bottoms of the supports used in printing and the model itself. Due to this distance (clearance), it would indicate the ease with which the support can be removed.
Normally, the default support Z distance in the Cura is equal to the layer height. Still, experts advise that for users to provide sufficient clearance for easy support removal, the support Z distance should be set to twice the layer height.
The ease with which the support can be removed further increases the likelihood that the model surface will remain smooth after the support has been removed. This is thanks to the reduced surface area of the model that was in contact with the support. It should be understood, though, that there is to be a balance between maintaining clearance for removal of the supports and weakening the support, so care should be taken to ensure that the latter doesn’t occur to the extent that is detrimental to the model. Finally, though twice layer height might do the trick, a little experimentation might reveal a more suitable Z distance setting for your printing.
 The support interface usually refers to the layer of support material that would immediately contact the model. It is usually advised that this interface be denser than the other part of the support to enhance the strength of the support further.
The setting allows for the above-stated advice to be put into practice. Furthermore, the support interface density setting can be specified via the enable support floor and supports roof settings. Tweaking or adjusting the latter would affect the density of the top of the supports, while the former would affect the bottom.
 We have established that the tops and bottoms of the supports should logically be the densest parts of the support. The gradual support infill steps settings would help determine just how dense the tops and bottoms would be by affecting the filling of the material into supports and thus their density.
More specifically, this alters the speed and thickness of the filling from the center to the extremes. The nature and thickness of the part to be supported would thus affect the value it should be set at. Experts suggest that three would be an excellent setting to start from, and a little experimentation from there would help determine the most suitable setting for future operations.
 As we previously stated, the best support pattern for use in 3D printing would depend on the model being printed and your particular situation. Depending on those two criteria, the most suitable pattern would be the one that offers the most applicable balance of strength, speed of printing, and ease of removal of the support.
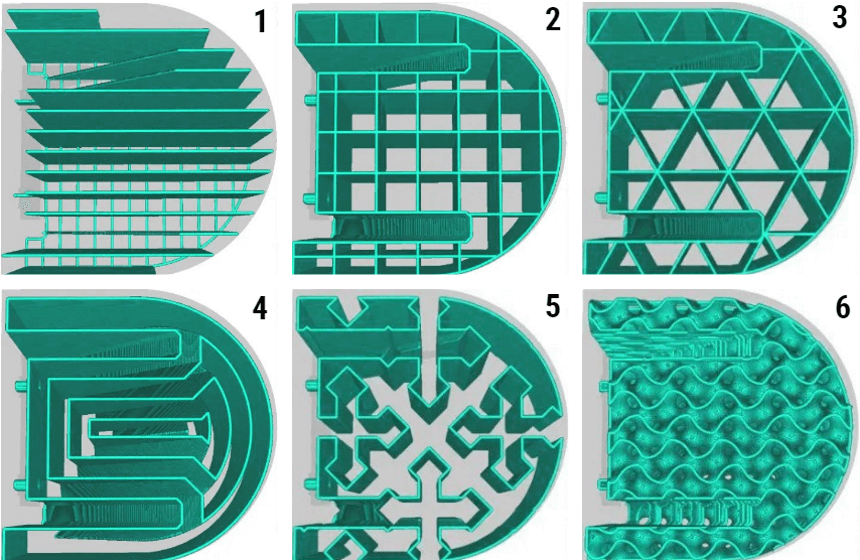
The Zig-zag pattern is preferred by many 3D printers primarily because it is easy to remove and provides strength without needing a lot of density. The other support patterns for 3D printing are:
1. Lines
The lines pattern (as the name implies) sets the pattern up in parallel lines and is a perfect pattern that is stronger than the zigzag. It, therefore, provides stronger support, but the disadvantage is that it is harder to remove after printing.
2. Grid
The grid pattern involves the formation of the support in the form of overlapping squares vertically and horizontally. While the pattern is recommended for the strength of the support that it produces, its lack of flexibility could lead to the supports being too difficult to remove.
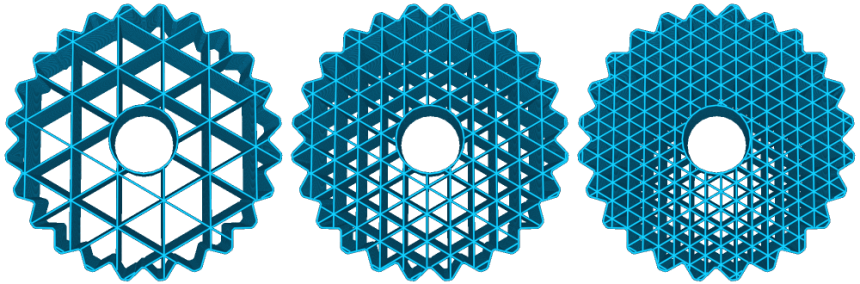
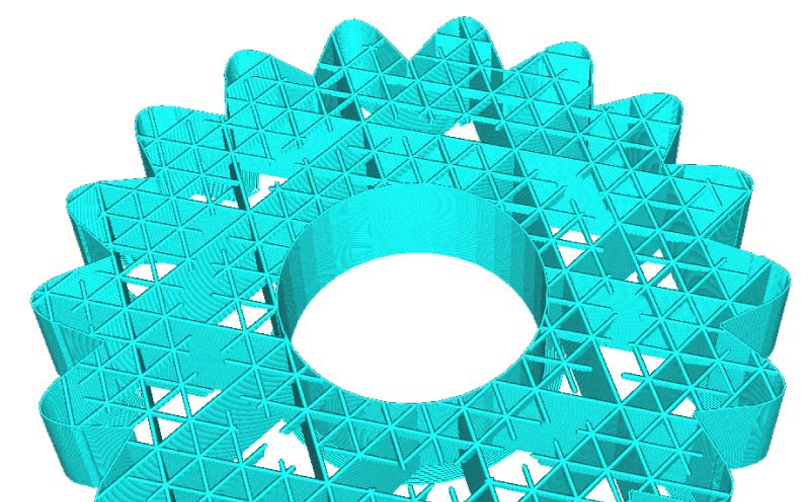
3. Triangles
The triangle pattern is even less flexible than the grid pattern. As a result of this, it produces the strongest support and would be more difficult to remove after printing compared to the grid pattern supports.
4. Concentric
The concentric Trusted Source Concentric | Definition of Concentric by Merriam-Webster Concentric definition is – having a common center. www.merriam-webster.com supports bent inward and are very suitable for providing support for overhangs. They are also relatively easy to remove. However, they have usually messed up during their creation which my little gaps might weaken the integrity of the support.
5. Cross
Of all the support patterns provided by the Cura, the cross support pattern is easiest to remove. The downside to its use is that it doesn’t provide quite as much strength as the others.
6. Gyroid
Digital support pattern Trusted Source Gyroid - Wikipedia A gyroid is an infinitely connected triply periodic minimal surface discovered by Alan Schoen in 1970. The gyroid separates space into two oppositely congruent labyrinths of passages. The gyroid has space group I4132 (no. 214). Channels run through the gyroid labyrinths in the (100) and (111) directions; passages emerge at 70.5 degree angles to any given channel as it is traversed, the direction at which they do so gyrating down the channel, giving rise to the name “gyroid”. en.wikipedia.org is one of the most popular among users and arguably the most popular after the zigzag and lines patterns. This is because it allows for uniform supports across all parts of an overhang. It does this by the creation of a wavelike pattern within the support structure. In addition to this uniform support, it can also be created faster and is quite sturdy.
 One of the latest additions to the Cura is the access to customer support settings. Access to customer support settings used to be one of the differences between the Cura and simplify3D (another premium slicer) but not anymore.
To access this custom support setting, users would have to download a plugin within the Cura software. This plugin can be found in the marketplace of the app, and it’s called the cylindrical custom supports.
After the plugin has been accessed and downloaded, users will be required to restart the Cura before allowing access to the customer support settings.
This plugin would allow for even complicated supports to be created very quickly and can be used to customize details of the support like type, size, shape, etc. The available support shapes that can be accessed via the custom settings are:
Cura supports settings such as gradual support infill density, support Z distance, etc., would still apply.
As we stated earlier, the tree support technique used in creating some support structures is most applicable for complicated models with many or delicate overhangs. Furthermore, in creating a tree support structure, other settings such as branch angle, branch distance, and branch diameter would need to be set. These are not the only necessary settings, however.
The other settings needed to customize tree support will be found under the experimental tab of the Cura. They are the tree support branch diameter angle and the tree support collision resolution.
Experts recommend a branch angle of between 40° and 50° for tree supports, a branch distance of at least 6 mm, and a branch diameter of between 2mm and 3 mm. We, however, advise users to experiment on these values to determine which works best for them.
The tree support branch diameter angle represents the angle of the branch diameter growing towards the bottom. In contrast, the tree support collision resolution represents the accuracy with which created branches can avoid collision with one another.
The default setting of the tree supports collision resolution is 0.2 mm, and that of the branch diameter angle is 5°. These are also considered the best settings for both parameters. Still, you may experiment while printing to determine how various values translate to the final results and if other values might be more appropriate for your operation.
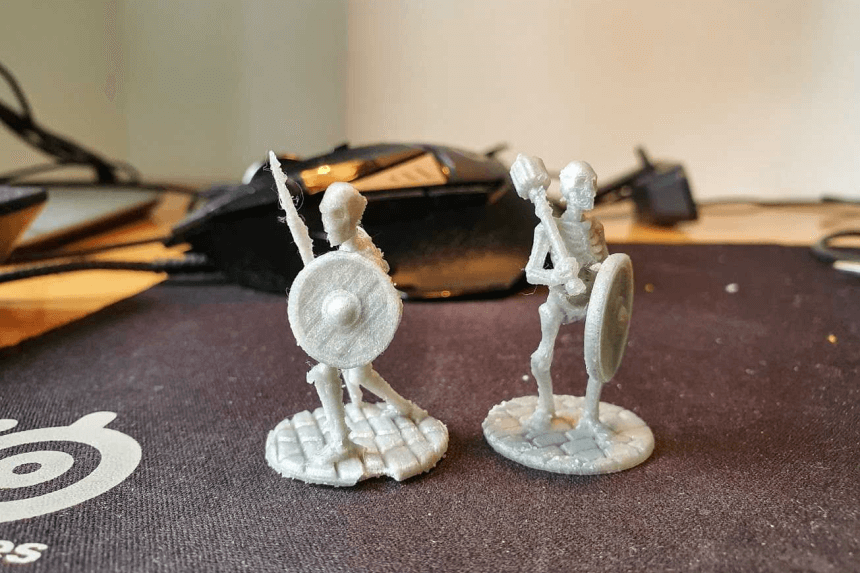 All of the above settings would play a role in the printing of miniatures. The appropriateness of your 3D printer for miniatures is also an important factor influencing the final quality of the model that would be produced.
As we have advised, the support structures used for any printing should depend on the complexity of what you are printing, or you can also opt for custom supports. For support placement, it might make a lot of sense to stick to the touching build plate setting to avoid overcomplicating the printing and post-printing processes.
It has also been suggested that printing while using a good orientation reduces the need for supports which is usually a good thing. It reduces the printing time and the likelihood that the surface of a model would be roughed up by contact with supports.
Another set to be considered when printing miniatures is the Overhang angle. It is suggested that an overhang angle of about 50° is an excellent setting to start experimenting from, but for miniatures, 60° would be more appropriate. Bear in mind that the closer the overhang angle is to 0, the more supports would be created, and the closer it is to 90°, the fewer supports are created.
The most appropriate support pattern for miniatures is the lines pattern, as it allows for more detail while printing. It would also work well with the default support density setting of 20%. We previously shared that twice the layer height is the optimal support Z distance favored in 3D printing, and this stays true for the printing of miniatures. Still, a standard value of 0.25 mm seems to be also very popular.
Printing a high-quality miniature would require a high-quality 3D printer, like the Creality HALOT ONE UV Photocuring Resin 3D Printer or the Official Creality Ender 3 V2 Upgraded 3D Printer, and careful but precise adjustment of the support settings. However, as in all printing, expecting to get it all right at the first try is illogical, and you must embrace the need for experimentation in your printing process.
Strong supports are necessary to prevent the sagging of overhangs, but a balance must be maintained because if the supports are too strong, they would be difficult to remove after printing. A couple of settings that we have touched upon could affect the strength or removability of the supports.
For starters, the support density settings are best left on the default 20%, but it should be considered that the support pattern could have a say in the overall strength of the support even at that default setting. For example, the gyroid pattern at the default density would be stronger support than a lines pattern at the same setting. That said, the zigzag support pattern is most preferred as it would reduce the support density in instances where the supports are too strong.
Two further settings that can reduce the effect of strong supports (and make removal easy regardless) are the support Z distance setting and the gradual support infill density setting. Both might also be used in conjunction with the enable support interface setting. While the support Z distance setting would help optimize the distance between the support and model to balance contact and removability, the other two would influence the density of the support at the top and bottom of the supports.
The most appropriate Z distance setting should be twice the layer height while altering the gradual support infill setting, and the support interface setting would help ensure that the density of the supports is highest in the parts in contact with the printed model. This would help to reduce the materials used in the support and maintain the strength of the support while doing so.
Sometimes, the supports are too strong because they are unnecessary. This could happen when the Cura software is used to determine where the supports should be placed without input from users. To remove the supports that are unnecessary (and reduce both the printing time and materials used), the support blocker could be used.
3D printing is satisfying and practically applicable in many situations. That’s the motivation behind all of the strides that have been recorded in the field. However, 3D printing would not be possible without slicing software, and one of the most popular slicers is the Cura.
Moving forward, though, to fully capitalize on the slicing software and optimize it for quality printing, knowledge of the support and support settings is important. By extension, this would mean that the knowledge of Cura support settings and Cura support patterns are important.
We have tried to educate you on the settings resent in the Cura, what they mean in a practical sense, and how they would translate to printing. However, a few words wouldn’t make you experienced; practice will. So, take our information and subject it to some developmental trial and error.