The Creality Ender 3 series are known for their excellent 3D prints. However, if you begin to notice a reduction in quality from this device, then there might be something wrong with your nozzle that requires attention.
Like many devices, the Ender 3 Nozzle is one of its most delicate parts requiring special care and attention. Luckily the Ender 3 printers come with replaceable nozzles in different options and sizes to maintain the production of excellent files.
This Ender 3 nozzle replacement guide will show you ways to replace the extruder nozzle without any difficulty.
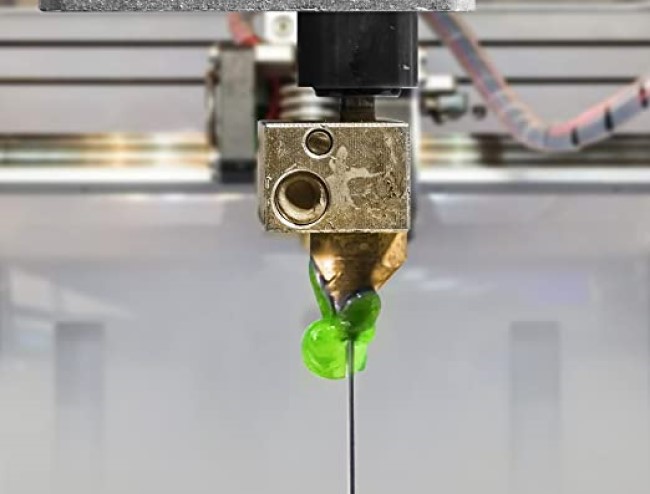
As soon as you notice the printing quality of your Ender 3 printers appears lower than the usual standard, it is often an indication your nozzle is worn out. Sometimes you may notice these particles from the outer part of the nozzle if it is clogged up. Other times your Ender 3 may require a Creality Ender 3 nozzle replacement.

The Ender 3 series is an excellent 3D printer that produces 3D designs in high quality when experimenting with materials and techniques Trusted Source 3D design - Experimenting with materials and techniques - GCSE Art and Design Revision - BBC Bitesize Learn about materials and techniques which can be used to create different effects for GCSE Art and Design. www.bbc.co.uk .
However, the nozzles of the Ender 3 v2 and other Ender 3 models tend to get rusty or weak, especially after consistent use. Looking at the Ender 3 Pro vs. Ender 3 v2, you notice similar nozzle types and durability.
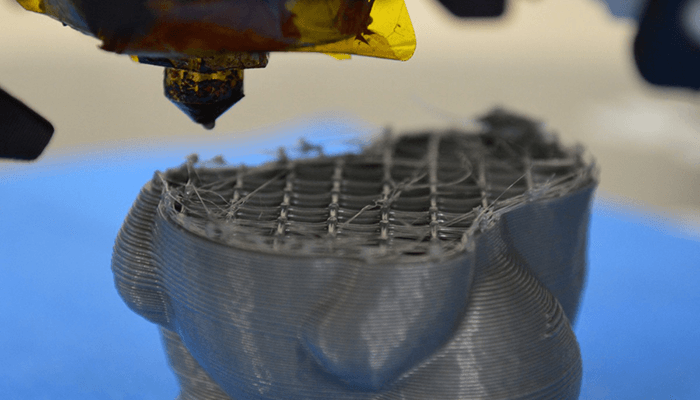
Sometimes you may discover particles that make it obstruct a smooth printing process. Your models or prototypes must come out just like you want them to appear. Getting the best Creality 3D printer will ensure you get high-quality prints for your use.
The Ender 3 nozzles play a vital role in determining the quality of these designs. This is why you need to examine the extruder nozzles regularly. You may discover a worn-out or clogged nozzle causing inconsistent printouts. In most cases, you will need to replace the nozzle with a new one that suits the dimension of your Ender 3 model.
Cleaning the nozzles may not be the best option as you might not get the same high-quality prints. This is why you should consider an Ender 3 v2 nozzle replacement, as there is a possibility you damage the nozzle or make your prints look worse when cleaning. Once you replace the old nozzle with a new one, you will not have to struggle with clogging from time to time.
Changing your Ender 3 Nozzle is relatively straightforward. However, you will need a few tools to help you get through this process.
Here is a list of tools you will need:
Replacing the nozzle of the Ender 3 v2 or Ender 3 pro is not a challenging task. However, one vital tip you should know is never to try to remove the nozzle while the hot end is cold. Choosing to do this may affect the heater block and possibly damage the whole hot end of the nozzle.
With the future of 3D printing Trusted Source 10 Exciting Ways 3D Printing Will Be Used In The Future As 3D printing continues to mature, its practical uses are seemingly infinite. From artwork and toys to entire buildings and even transplantable organs, this technology can go as far as our imaginations will allow. www.forbes.com looking very promising, we can expect advanced developments as time goes on.
Let’s look at how to replace the nozzle on Ender 3. With these following steps, you will be able to change your Ender 3 nozzle easily.
Before you begin replacing the nozzle, the first thing you should do is disable the stepper motors. This is important when making an Ender 3 pro nozzle replacement as it will allow you to adjust the gun turret and easily access the bottom of the hotend.
The next step is to disable the fan shroud to gain more access to the nozzle. You want to ensure you do not damage any part of your 3D printer while removing these parts. This is where the Allen keys come into play. You will need an Allen wrench to unscrew the bolts attached to the fan shroud.
The silicon sock does not require any special tool for removal. You will find it easy to dismantle this part easily once you remove the fan shroud.
Remember, you must never replace your nozzle while your hotend is cold. If you try to remove the nozzle while it is cold, you may damage the part. For this reason, you will need to heat up your hotend to remove the nozzle.
This process will allow the nozzle to open up slightly so you can loosen the threads quickly. If you skip this process, you might likely break the nozzle or the heater block, which will require another replacement.
To heat the hotend, you will need to go to the control option, select “temperature,” choose the Nozzle icon, and then set the temperature. After that, you should preheat PLA, then select preheat peel, which will heat the hotend. Once the hotend gets to about 185 degrees, you can then screw back the two bolts (Allen keys) that hold the fan shroud in place.
As soon as the hotend is heated up enough, you will have no trouble removing the nozzle. Since the hotend is still hot, you will need Cresent pliers or channel locks to pick the nozzle. However, large regular pliers will get the job done if you do not have this appliance.
Use the pliers to pinch onto the nozzle, so the hotend does not move as you unscrew the nozzle. Continue to unscrew anti-clockwise until the nozzle eventually comes out. Screwing clockwise would be tightening the screw, and you won’t get the nozzle out that way.
Now all is to install the new nozzle. Before installing the new nozzle, you should ensure the hotend has cooled down. Once the nozzles are off, you can replace them with newer ones. For this, you can screw them with your hands or a spanner up to a point before coming to the next and final step.
For the final step, you will need to heat the hotend once again to allow you to tighten the nozzle up. Make sure not to make the screw too tight or risk damaging the nozzle.
The video below shows how to easily replace a nozzle on your Ender 3.
Whenever a 3D printer produces poor prints, most people usually assume something is wrong with the printer. Before making any rash decision, you should troubleshoot the printer and check for any issues.
3D printing Trusted Source 3D printing - BBC News All the latest news about 3D printing from the BBC www.bbc.com is fast becoming an exciting hobby for many individuals, including children. You can get the best 3D printer for kids to develop this hobby and prevent them from mishandling your personal 3D printer. If you notice your Ender 3 is not working or printing correctly, you may need to replace the nozzle. For this, you need to know how to change the nozzle on Ender 3, or you can try out a few things.
Below are the answers to some of the most frequently asked questions about Ender 3 nozzles.
There are different types of nozzles, and the type of nozzle you use determines its longevity. However, you may need to replace your nozzle every month for constant quality prints if you print regularly.
If you ever notice your Ender producing low-quality prints, you may need to replace your nozzle. While some people make the mistake of getting a new 3D printer, you might want to change the nozzle before taking any other step.
3D printer Nozzles come in different sizes, materials, and dimensions. You should always choose the most compatible one with your Ender 3 model.
3D printers can sometimes be tricky and require proper care for you to get the best out of them. The Ender 3 nozzles are one crucial part of the device you should take care of regularly.
As long as you follow this Ender 3 nozzle replacement guide, you will continue to consistently enjoy excellent and high-quality 3D prints.