
Nothing makes you happy as a 3D printer owner than when your machine prints your models flawlessly using a PETG filament. Whether you are building a prototype, Smartphone holders, 3D cases, hinges, decor, or replacement parts, nothing beats the feeling you have when you get a flawless print.
However, sometimes this is not the case. Your machine is bound to run into problems when not maintained correctly or if you don’t follow the recommended procedures when using it. You could run into several issues such as PETG not sticking to bed, and a blocked nozzle, just to name a few. If your PETG filament is not sticking to your printer’s bed, then don’t worry. This problem is common with this type of printing material. Various things cause it, and they can be fixed without much hassle.
PETG is an acronym for Polyethene Terephthalate Glycol. It is a filament used to 3D print plastic containers, bottles, food packaging, and so forth.
On the other hand, PLA is an acronym for Polylactic Acid. It is a default choice for many extrusion printers because the filament doesn’t require a heated bed and can be printed in lower temperatures.
Here is a small comparison of PETG vs. PLA:
There is also another popular filament known as ABS. It is an acronym for Acrylonitrile Butadiene Styrene. This material is opaque and commonly used to print consumer products.
Here is a comparison of PETG vs. ABS:
Among the three, it’s only PETG that can print food-safe containers Trusted Source Packaging & Food Contact Substances (FCS) | FDA Links to industry guidance, forms and inventories for food packaging and food contact substances. www.fda.gov . It is also transparent and can make water bottles, medical bottles, canopies, and translucent sheathing.
Every filament also has different printing characteristics and performance. Each material also requires different settings and probably add-ons. For instance, it is recommended that you heat your bed Trusted Source Printability and Tensile Performance of 3D Printed Polyethylene Terephthalate Glycol Using Fused Deposition Modelling Polyethylene terephthalate glycol (PETG) is a thermoplastic formed by polyethylene terephthalate (PET) and ethylene glycol and known for his high impact resistance and ductility. The printability of PETG for fused deposition modelling (FDM) is studied by monitoring the filament temperature using an infra-red camera. The microstructural arrangement of 3D printed PETG is analysed by means of X-ray micro-tomography and tensile performance is investigated in a wide range of printing temperatures from 210 °C to 255 °C. www.ncbi.nlm.nih.gov to produce good PETG prints. PLA has a low warp and does not require a heated bed.
When it comes to printing speed, PLA holds the title for 60 millimeters per second. PETG can do up to 100 millimeters per second. After printing, you can do PETG smoothening using sandpaper. For PLA, you will have to coat it with epoxy or clear vanish.
During the building process, PLA doesn’t require you to be that perfect. It is reliant if you make any minor print errors. With PETG, everything has to be perfect, including bed and nozzle temperature. Make a slight mistake, and you will ruin your PETG model.
Here is a more detailed comparison of PLA and PETG printing performances:
As mentioned earlier, PETG is not forgiving and requires perfect settings to churn out high-quality prints. Luckily for you, every printer comes with pre-installed software that automatically adjusts settings based on the filament you are using. If your printer does not have a PETG profile, do not use the available PLA or ABS settings. If you do, you might experience problems with bed adhesion and build quality.
If you do not have a PETG profile, it is best to adjust the settings to the recommended ones manually. There are our recommendations:
So, you have adhered to the recommended settings, but still, your PETG is sticking to your print bed. What could be the reason for this behavior? Well, here are some reasons why your 3D models are not adhesive to your printer bed.
PETG has a high melting point. This characteristic necessitates the use of a high extruder temperature. Your build plate must also be heated, and the temperatures should be correct to the end.
If you have issues with adhesion, we recommend adjusting your extruder temperature to any figure ranging from 210°C to 250°C. Your build plate should have a temperature of 75°C to 90°C. If you still have adhesion issues, you can increase the build plate settings to as high as 120°C.
For a filament that comes with a detailed manual, stick to the manufacturer’s values. They usually test their products and know the best-operating temperatures that will give you hassle-free printouts. Also, every filament on the market is different. The qualitative differences influence temperature sensitivity. Hence, it is always best to go with the manufacturer’s recommendations rather than ours.
If the problem persists, then you better switch to another filament. You should try out a material that is simple to use and does not necessitate specific temperature settings. According to most user reviews, the 1.75mm PETG 3D Printer Filament should be a perfect choice for you. The material does not necessitate a heated bed and adheres to the bed easily.
PETG, just like any other thermoplastic material, softens when heated and hardens when cooled. During the hardening phase, it also contracts. The rate of PETG contraction can affect its adhesive properties.
If you do not set your fan correctly, the 3D model you are printing will form sticky threads and blobs. The result will be a 3D printout that cannot stick to the bed.
To prevent this from happening, we usually recommend that you keep your fan switched off or running at a slower pace during the first few layers of your printout. Since PETG will be cooling slow, it will be more adhesive to the bed.
Do not forget to switch on the fan after the second or third layer to ensure the 3D model is not soft. If it is too weak, it might end up collapsing.
If you do not have a fan on your printer, start using high temperatures on your build’s first and second layers. After that, lower it and make sure there is a proper flow of air to facilitate cooling.
As you know, 3D printing occurs in layers. One layer is always built on top of the other. The two must bond to produce a perfect model. So, if you print the first layer wrongly, you might encounter bed adhesion problems.
The second layer will not adhere properly to the first. If any of your layers have poor adhesion, your object might fall off before you finish printing. To avoid this problem, we advise you to print your layers with the correct calibration.
If you have automatic calibration software, use it to get the correct settings and minimize errors. If you do not have it, we recommend that you adhere to the filament manufacturer’s recommendation. You can also use the suggestions in this guide if your filament does not come with a detailed user manual.
So, what printing speed should you use? Well, this question has tens of different answers. If you pose it to advanced 3D printing experts, they will all give diverse answers. Various PETG filaments have distinctive properties. Their recommended print speeds will always differ. Even PETG materials from the same brand will have different optimal building speeds depending on their storage and transportation conditions.
We recommend sticking to speeds of between 30 to 120 millimeters per second. Experiment with all the values in between the ranges to find the best rate that has excellent adhesion. If you are not in a position to do this experiment, use the manufacturer’s recommended speed.
PETG contracts when cooling down and expands when heated. Your printer’s bed and nozzle usually become hot when printing. If they contact your PETG, it will be heated up, and expansion will occur.
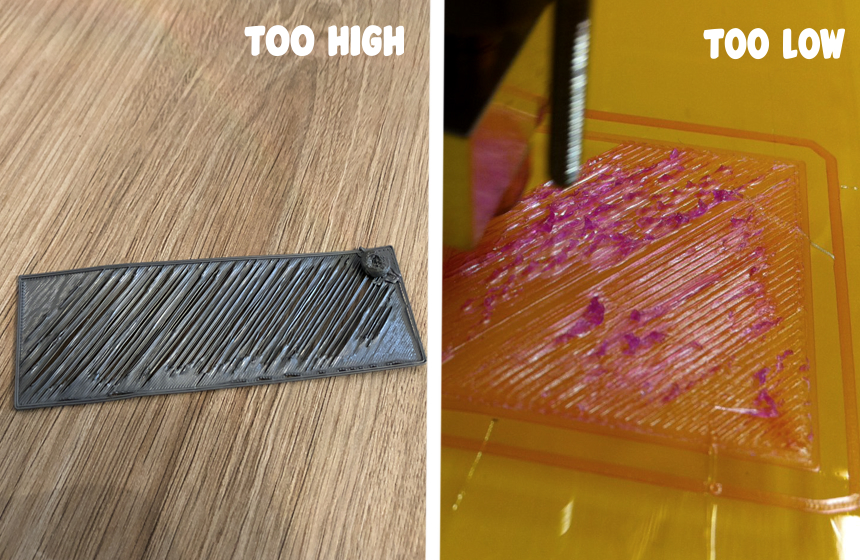
A hotbed will make your filament expand upwards and move too close to the printing nozzle. If the nozzle comes into contact with your PETG material, it will be heated up. The heat will make it expand and cool slowly. This expansion leads to a weak adhesion at the bed.
To avoid this problem, we recommend that you monitor your nozzle spacing. It should be set so that it does not come into contact with the model it is printing.
Poor adhesion can also be caused by bed expansion. Most building beds are made of a material that can expand when heated. Since PETG requires a bed temperature of 75°C to 90°C, the expansion will occur.
When the printing bed expands, the distance between your model and nozzle reduces. A possible solution to this problem is to heat your bed first before you start printing. Also, it would be best if you considered choosing materials that do not expand much when heated.
Some models tend to string after being printed. Stringing occurs because some parts of the model are still soft and flexible. The part that strings is usually the one that was built last.
This issue happens when you use a very high build volume or high density. In these cases, the last layers will take longer to cool down than the other layers. So, the previous layers will remain soft and flexible while the rest of the model hardens. The soft layers will stick to the nozzle. When it is traveling between any two points, it will produce strings or “hairs” which mess up with your design.
To prevent stringing, you need to reduce your travel distance or increase retraction. For example, if you want to print a small cube, you could lower the build volume to 0.1mm^3 so your nozzle won’t have to travel so much. Or, you could leave your build volume as it is but increase your retraction distance and speed to about 5 millimeters per second.
You can also try using a fast nozzle speed. The quicker it will travel, the less time your material will have to ooze. Increase the rate by 10 millimeters per second increments until you get a perfect model with no strings.
If you transport or store PETG filaments improperly, they may absorb water and become wet. At such a state, the quality of your printouts will suffer considerably. The material might not even be able to stick to your bed correctly.
To avoid making your filaments damp, store them in air-tight plastic bags or containers. You can also purchase unique silica gel bags made to keep 3D printing materials.
A low-quality filament will have a lot of errors compared to a premium one. It will suffer from quality and adhesion problems. To get a hassle-free 3D printing experience, we recommend that you only purchase reputable PETG filament brands.
The OVERTURE PETG Filament is one of the best printing materials that have a good reputation and reviews. The filament is of high quality and will rarely have adhesion issues. If you are printing models you intend to use in extreme conditions, make sure you choose an outdoor 3D filament for quality builds.
A bed with non-stick dirt will lead to adhesion problems. Be sure to clean your plate and heat it to remove any impurities that might interfere with PETG properties.
The printing surface must be free from grease too. If it is greasy, clean it using isopropyl alcohol. Use gloves to avoid touching the surface while cleaning it.
As mentioned earlier, print plates do expand when heated. The rate of expansion depends on the material used to make them. Also, each bed has different adhesion properties.
We recommend trying out different models to find out which suits your bed. Make sure you read the manufacturer’s recommendation for each plate you try out, as each model requires different temperatures and settings.
For instance, if you have a PEP bed, you will need to print the first two layers while the plate is heated to 100°C. The temperature should be reduced to 90°C for the following five layers. A reduction of 10°C is required for all the others. If you do not follow these steps, your model will warp. It may also not adhere to the bed properly.
For proper adhesion, we recommend using a glass plate. When treated with citric acid and heated to 75°C, it has excellent bed sticking properties.
Before you start building, make sure the glass is not greasy. Position your nozzle in such a way that it has a small gap since glass doesn’t expand too much when heated. For the first layer, you should maintain a bed temperature of 110°C. After that, drop it to about 75°C for the subsequent layers.
After printing, you will notice that your model is firmly stuck to the glass place. Please do not attempt to remove it forcefully. Instead, we recommend using cold water to cool down the bed. When the glass contracts, your model will come off without much hassle.
Several individual problems can cause PETG adhesion problems. They can result from improper temperature settings, wrong nozzle distance calibration, or a dirty bed. Sometimes the problem could be as a result of poor quality or dump filament. Incorrect print speed and a first poor layer are also other causes.
To fix the PETG not sticking to bed problem, experiment with various settings, tapes, sprays, and glue sticks. Make sure you have a clean bed, use the correct speed, temperatures, nozzle distance, and fan settings.
If you can afford an expensive PETG filament from a reputed manufacturer, go for it. You better spend a lot to purchase printing materials than to sacrifice the quality of your models. Not only do cheaper filaments produce poor prints, but they are also prone to printing problems such as poor bed adhesion, warping, and so forth.
