Did you know that infill patterns affect a part’s strength, weight, flexibility, and print time? The different varieties available are an integral part of 3D printing, and you have to ensure that you understand the intricate details involved before you begin the process. Certain dynamics come into play when you are choosing an infill pattern for your project. For beginners, selecting the ideal alternative may be an uphill climb.
In this article, we dive deep into the finer details of the best infill patterns that you will come across as you look for the appropriate choice for the task at hand. Additionally, we include information on other factors that make 3D prints strong. The equipment you have and your expertise will determine the output of the work you are doing. As per reviews, ELEGOO Resin 3D Printer Mars 2 Pro is among the durable models in the market that you can consider for your business. Read through to the end and familiarize yourself with 3D infill patterns.
You have to determine the function of the 3D printed Trusted Source History of 3D Printing - ScienceDirect Since its invention 50 years ago, 3D printing technology has progressed at a rapid pace, with significant impact in both the industrial and commercial world. Stereolithography, selective laser sintering, and fused deposition modeling were among the first widely successful methods of 3D printing, initially used for industrial prototyping. 3D printing technology was soon developed for use in a variety of fields, for large-scale manufacturing, engineering of highly complex parts, and even for personal use. www.sciencedirect.com part before you choose the best infill pattern for the job. There are over ten alternatives available, and selecting the appropriate option can be tasking. Some that you will interact with are better than others as they provide more potent. Another aspect that sets the various infill patterns available in the printing time.
If you are looking to achieve 100% infill without using too much filament, the cubic pattern, also known as the honeycomb, is what you are looking for.
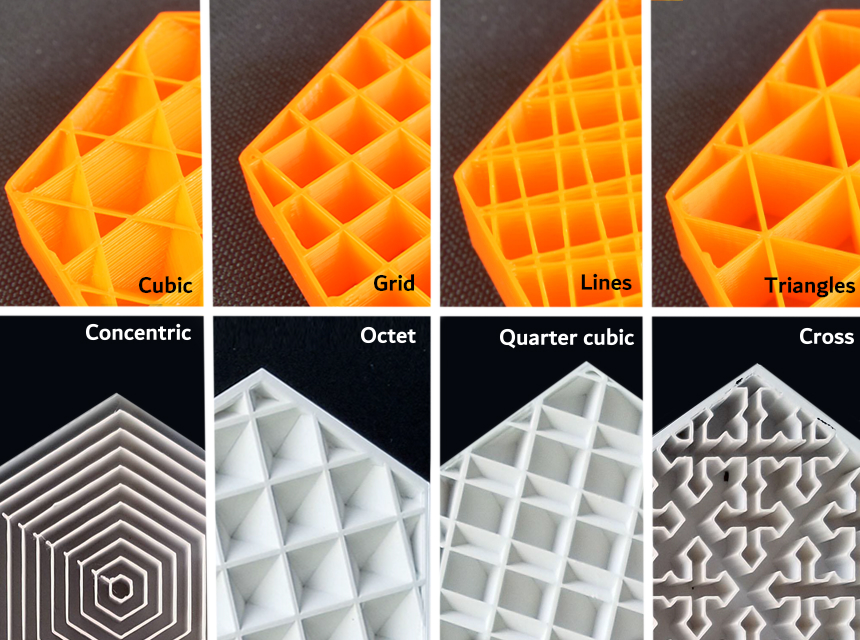
Infill patterns play different roles in the printing process. The project dictates the best choice to go with. Knowing the options available is vital if you want to decide faster and accurately. Here are some of the best infill patterns listed by experts in this industry.
These are not the only alternatives that you will find in stores. Technology has made it possible for manufacturers in the 3D printing world to bring more equipment to cater to the needs of the general population. Learn the commands of the printer. You have to know how to control the infill pattern and shell patterns to achieve optimal results for each project.
Beginners should start with straightforward prints using the easy-to-use infill patterns then gradually begin exploring the other options available.
Infill percentage is another fundamental element that you have to pay attention to when 3D printing anything. It affects the strength of the different parts of the project you are working on. 100% infill is the strongest infill that you can opt for. Important to note is that other factors affect the strength of the parts. Printing time and material are the other factors that you have to bear in mind. Twenty percent is the average infill percentage that most users apply, and it also defaults in an assortment of slicer programs. Increase the infill percentage for functional parts to guarantee the sturdiness of the parts. Increasing the percentage wastes the filament and makes the parts heavier, which could lead to breakage.
The quickest infill patterns use minimal print time and materials, making your work more manageable. Of all the types that you will come across, the line infill pattern is the quickest option to print. It is a popular alternative and a default for most slicer software in the market.
Ensure that the strength and purpose of the part allow for the use of the line infill pattern before you rely on it for urgent projects.
The infill pattern is one of the many things that affect the strength of the prints. The choice of material such as resin vs. filament and other factors will affect how strong the output will be. The purpose of the print you are working on will help you select the correct pattern and modify the settings accordingly to ensure that all aspects are well thought out and executed. 3D applications are evolving, making it possible for you to use a host of materials that serve the needs of your project better. Here are some of the factors that make 3D prints strong.
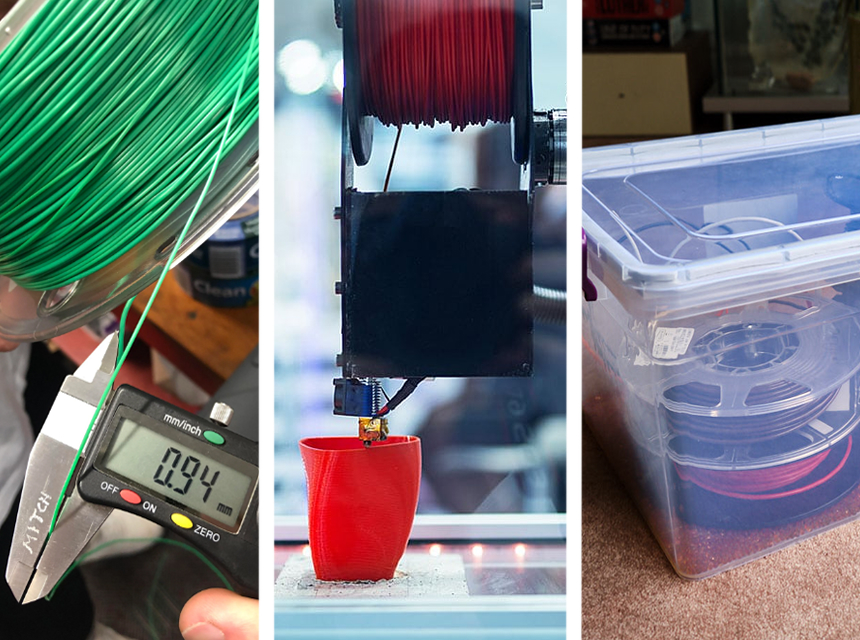
Filament quality varies from one manufacturer to the next. Producers in the industry bring products with different values to the market. Quality is an intricate aspect to review when you are buying filaments. Buying from a reputable manufacturer will save you the hassle of finding the best in stores. Read reviews from other users and experts to establish whether the brand you want to buy is top-tier or not. Both positive and negative feedback will help you gauge the filament quality. Other than the quality, the size, density, and print temperature are the other aspects that you should assess. Filament storage is a critical aspect that you have to consider before you buy this material in bulk.
Manufacturing companies in this industry are availing multiple options for those in the printing business. Currently, you can buy composite filament that incorporates other components to improve the quality and, in some instances, the functionality. PLA is a popular filament in 3D printing since it is easy to print with. In recent years, manufacturers have been bringing this material to the market with reinforced properties. The cons are eliminated or reduced to improve the quality of the parts you print.
When choosing a filament blend to buy, assess the new components that the manufacturer includes to confirm the blend will deliver the expected print.
You can improve the strength of the parts during the printing process. Print orientation is an aspect that most people overlook. Strength, accuracy, surface finish, and surface finish are among the elements affected by the orientation. You have to identify the faces of the part that will avail good adhesion. The size should be adequate to provide enough stability throughout the process. Make sure you orient the parts so that a large number of parts fit on the build plate. Rotate the part at least forty-five degrees to increase the strength properties. The design elements of the parts will aid you in deciding the dimensional accuracy that you need, especially for the meeting points.
Shells are the outer parts of a model, also known as the perimeter. They have extruded outlines of a part that define the final shape of the print. Every item you print must have a shell. You can choose to increase the number if you want to improve the strength of the model you are printing. The printer settings should be able to accommodate the number of shells that you want without printing a solid model with no opening. The slicer settings can be adjusted to meet the demands of the project. Speed of the printer, temperature, and layer height are among the top factors that need adjustment before printing begins. Adding shells will increase the printing duration, but if you want a stronger print, it is worth the time.
Shells are an essential part of any model you print. As we mentioned above, the durability and strength of the models are dictated by this feature. All slicers include shell settings that you can alter to fit the specifications of what you are working on. The outcome relies heavily on the commands you select for the printing process. You have to set thickness for the top, bottom, and sidewalls. The main disadvantage that most printers have is that you cannot adjust one side without altering the other. Luckily, you can post-process or sand the part to get the final model that you want. Before making the tough decisions, remember the filament you are using. Compare PETG vs. ABS filaments or any other alternative you want to use and determine the appropriate shell thickness.
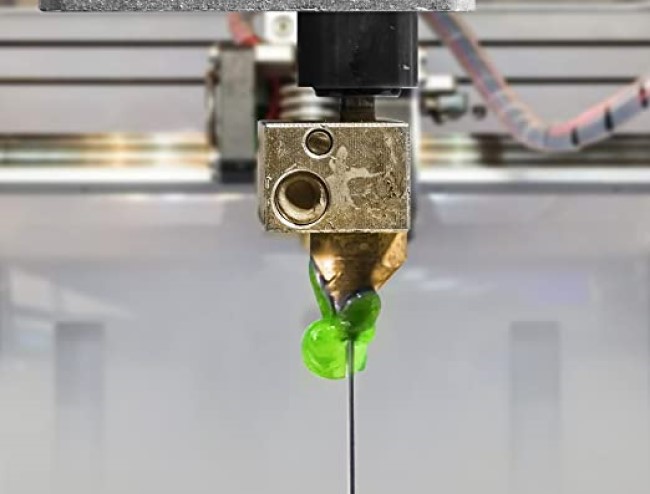
Over extruding has pros and cons that you should evaluate before you choose this as a method to add strength to the parts. This happens when the printer forces out the extra material. Calibrating the extruder will help reduce the amount of wastage in normal circumstances. However, if you are using this as a way to increase the strength of the parts, you have to compromise the precision and general appearance of the part you are printing. Over extruding is not a tried and tested method as there are no pointers on the best way to achieve the flow rate to guarantee good results. A ten to twenty percent over extrusion rate will increase the strength of the part. The settings feature will help you achieve this.
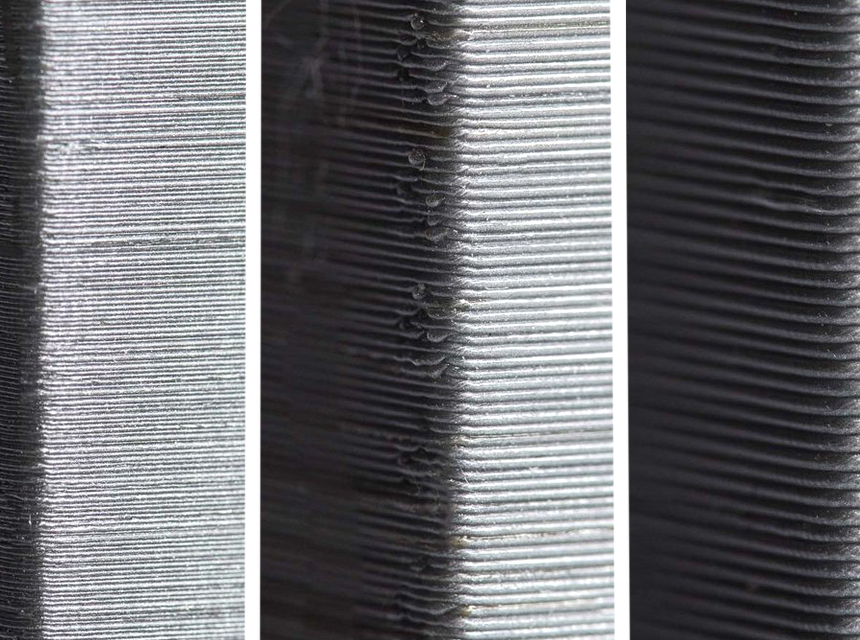
Printing smaller layers can aid in increasing the strength of a part, but it takes more time. People steer away from printing thinner layers to save time. Thin layers have smaller extrusion strands, and this guarantees the part more strength as composed to the bigger ones. The cross-section area and layer height contribute to the stability of the model as well as the strength. Thicker extrusions make the various layers rough, and this destabilizes the overall balance of the part. Solid layers play a pivotal role in stabilizing the infill. The pattern you select, material, and the number of shells all come together in layers; the smaller, the better.
Understanding the 3D printing process and the various factors that come into play is critical in ensuring the results meet your expectations. For instance, knowing more about PETG and PLA filaments will come in handy when choosing to use either for a project. What you are printing will guide you on the ideal pattern and materials to use. The density can be altered for the various parts to meet the specifications of the project.
If you need a strong part, the cubic infill pattern is the best alternative to use. The quickest option to use is the line infill pattern. You ought to try out the various patterns available to know more about them and the appropriate applications for each. Evaluate the needs of the project and select the best infill pattern to use after experimenting with each to ensure you get the desired results.