Did you know that 3D printing traces back to Japan, where Hideo Kodama utilized the additive process to create solid objects? After its inception in 1981, this form of printing has grown and is an integral part of the modern world. Machines necessary for the process have evolved over the years, and technology has helped improve the functional features to guarantee users the best results. Herein, we explore Ender 3 retraction settings and parameters related to the same to help you understand the dynamics and how to use them to your advantage.
According to reviews, Creality Ender 3 Pro 3D printer is one of the top-tier models available in the market. The unit is a creation of one of the reputable manufacturers in the business, and it is ideal for an array of applications in different sectors. Having a good printer does not necessarily mean that the end products will be top-notch. You have to adjust settings to accommodate the needs of the project to ensure better results.
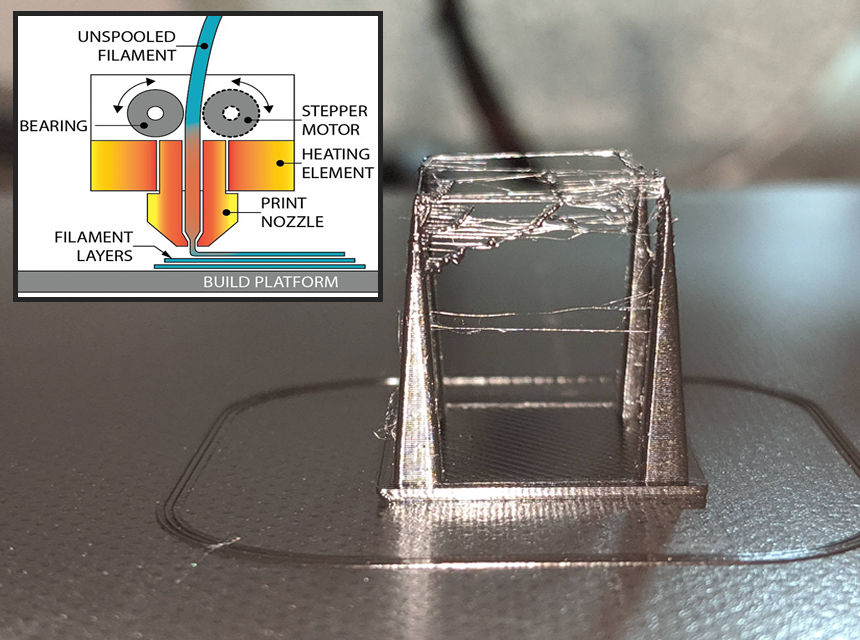
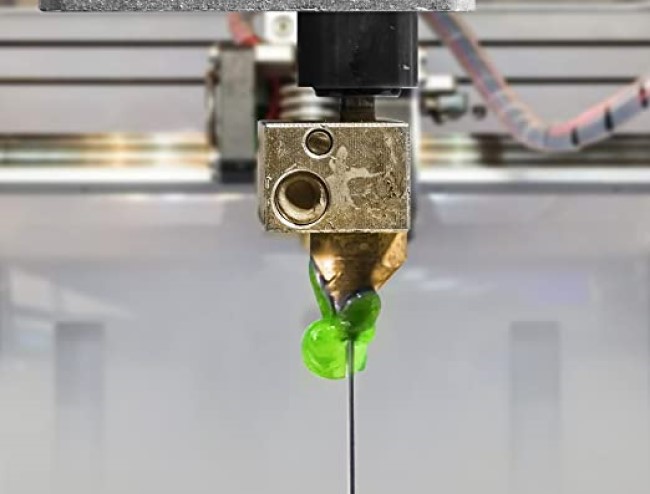
The extruder sends filament to the hot end through the toothed wheel. This pushes results in a pressure build-up inside the nozzle. When the temperature settings and extruder calibrations are accurate, the material will flow at the correct speed, and the amount will be ideal for the print in production. After the extruder motor stops, there is remaining pressure in the barrel that forces filament out through the nozzle. This ruins the model by depositing unwanted filament that upsets the surface finish. Reverse rotation of the extruder motor allows the extra material to be deposited on the hot end side.
Retraction is a functional feature in 3D printers that optimizes the quantity of filament that the nozzle releases. The speed at which the nozzle retracts is also part of the essential functions. This feature allows for the retraction of additional filament that will otherwise ruin the model undergoing the process through stringing.
Retraction is important for the reasons we discussed above. The dimensions and size of the end product should be accurate from when you are setting the printer for the job to the final product. Without retraction, it is impossible to achieve this as the machine will heap extra filament on the print during the process. When purchasing a printer, ensure that it has good retraction capabilities when working with the various filaments in the market. Before adjusting any parameter that influences retraction, evaluate all the other factors essential for the printing process to avoid upsetting the balance.
Certain parameters relate to this recoiling movement necessary in 3D printing to ensure the model has a smooth surface free of bumps from the extra filament. You have to understand how to set the different functions for the best results. The project you are working on will influence your decisions regarding how to set the parameters. Below we discuss the key issues that you have to address as you prepare to start printing.
Retraction distance is a crucial element that you have to be keen on as it dictates the amount of filament that will be retracted. The length you choose for retraction should not be small, as this will not solve the stringing issue. On the other hand, a wider distance may cause glitches in the system as there will be no material in the nozzle during the preliminary stages of the next extrusion. The priming setting will come in handy to help you control the filament movement from one part of the printer to the next.
The distance you choose for the project will be available in the nozzle after moving two points without extrusion. The recommended range for retraction distance for most Bowden-type 3D printers is between three and six millimeters. Start at three and monitor the process, then increase it if need be.
You have to decide the retraction count and set this accordingly on the printer to ensure you get the results you are after. The recoiling process happens in the same section of the filament. Printers that have the direct drive system are more precise than those that do not include this feature. You can modify the unit; you have to include some of the additional elements to make the process effortless for you. However, do not try to alter the main parts of the machine as this can destroy the parts that influence the fundamental functionalities. Start by setting the retraction count at a lower value, such as five or ten, and observe how it affects printing before increasing or reducing. Some models in the market have a maximum retraction count of one hundred, but this is considered too high.
Extrusion pulls back a section of the filament, making it necessary for you to determine the length that the maximum retraction count applies to. For instance, if you set the retraction distance as five millimeters and the minimum retraction count as ten, the printer will perform the number of retractions set for every 5mm. The settings vary on the many models available in the market. The best 3D printers for jewelry that can produce delicate designs have more setting options that you can rely on to ensure you get the best results.
Try out different lengths to establish the ideal option for the printer you have.
The extruder has to rotate in reverse to recall a segment of the filament to prevent dripping. How fast you want this to happen is the retraction speed, and it is vital that you define this in the settings to align with the other parameters. The pace you set ought to be fast enough to achieve the main purpose of retraction. The limit you set has to be realistic to ensure the printer can achieve the same without straining or losing the other steps necessary in the printing process. You can start at twenty millimeters per second and adjust this as you conduct the stringing test for the different types of filaments.
This parameter allows you to set the pace at which the filament is fed back to the nozzle. It controls how the hot end side of the printer reacts to the recoiling of the extra material. This enables the machine to continue extruding without acknowledging the retraction process. This aspect is divided into two limits for various reasons. The pressure is higher at the beginning of the retraction than at the end. This helps ease the pressure on the extruder gear. On the flipside, priming the strength in the gear increases, and this could damage the filament. Find a balance between the two is vital for a seamless printing process and to avoid changing the filament mid-way through printing.
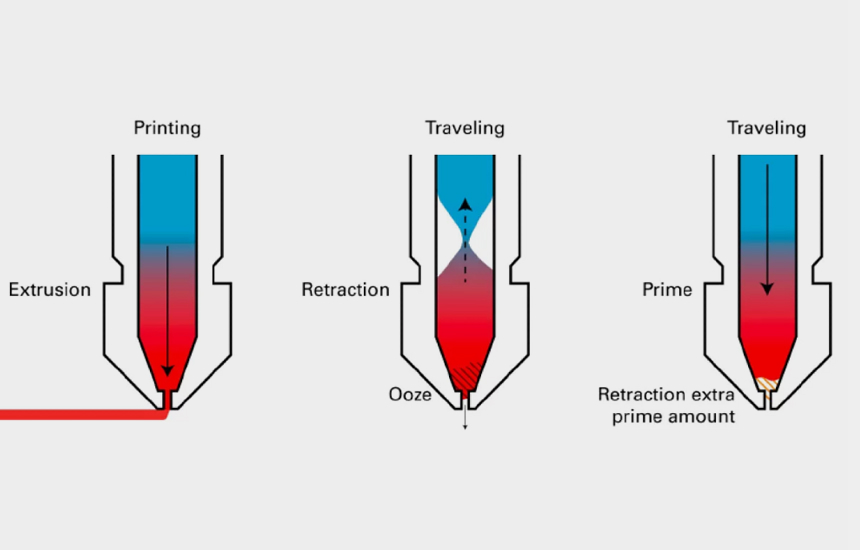
The extra prime amount is a parameter that you do not have to calibrate in most instances as it has no direct effect on the retraction process. It helps you compensate for the amount of filament lost through dripping. When the other parameters are set correctly, this limit becomes null. Leaving it at zero is what we recommend as you work on getting the other limits correct. Calibration tests will help you make informed decisions regarding the best settings to ensure accurate retraction. Read reviews of the model. You have to ascertain certain components of the printer. Expert Ender 5 Plus reviews help users understand all the parameters and the best way to work around them.
The retraction settings for Ender 3 printers are paramount for printer protection and preventing filament damage. Maximum retraction count allows you to adjust the number the teethed-gear can dig into a specific piece of filament. The implication is that the retraction count represents the number of retractions that occur over a specific piece of filament. If the filament retracts and primes too many times, it can get damaged. Therefore, setting the retraction count involves getting the right figure of retractions that happens on a particular filament size. It’s recommended to begin with a lower retraction count such as 5mm and keep on adjusting until you get your desired results.
Minimum extrusion distance window (MEDW) is the length of the piece of filament that is exposed to a specific number of retractions. For instance, a setting of 5mm Maximum retraction count over a MEDW of 10mm implies that a 10mm piece of filament will only allow a total count of 5 retractions.
The general rule of the thumb is to start with a low setting and increase or decrease until you obtain the desired results. Fundamentally, you will be looking for the lowest range to reduce the stringing effect.
Begin by setting the Combing Mode ON and set it to “within Infill.” Enabling the combing mode is essential to avoid stringing since it makes the object look undesirable. This setting gives four options, but for miniatures, the recommendation is to have it set at “within the infill.”
The next setting involves having the right retraction distance and speed. For the retraction distance, you will find 6mm as the most favorable at a retraction speed of 45mm per second-but you can adjust to your desired results.
For printing miniatures, set your maximum retraction count at 10 and the minimum extrusion distance window at 10mm. You should also consider disabling your Z-hop calibration as it is a source of increased stringing. Most importantly, follow the manufacturer’s guidelines on how to set the various parameters to ensure you get the best retraction function from the machine and avoid stringing.
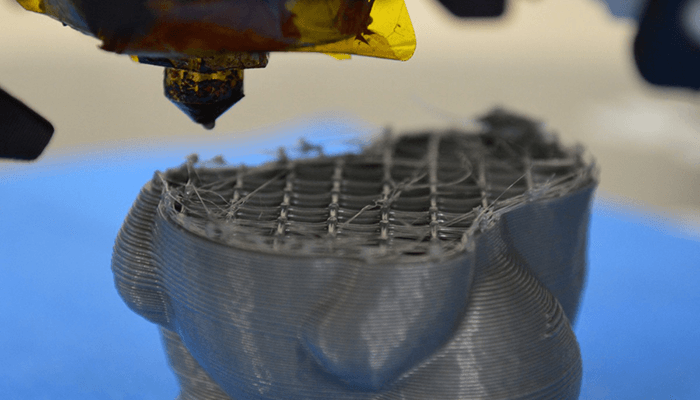
3D printing experiences a major challenge through stringing. The correct working effect for a printer is to use the correct settings that will allow the machine to print without dripping any filament that will ruin the appearance of the final product. Correct retraction and stringing calibration help avoid this challenge of extruding molten plastic for the desired output. The following three calibration tests are fundamental for a positive 3D printing effect.

Temperature is an essential factor since 3D printing relies on molten plastic. When the temperatures are too high, the nozzle will have less viscosity increasing the filament flow. When this molten plastic escapes from the nozzle, it coats the 3D printed model creating damage. For Ender 3 pro, the best temperature settings should increase by 50C in a well-defined layer. You will achieve this varying temperature calibration by clicking on “Things Files” to generate G-code as opposed to using the slicer program.
You achieve the basic stringing test after calibrating the temperature and disabling the retraction from the slicer. After disabling the retractions, print the file image that looks like two cylindrical rods standing on a flat object and check the results. The file will appear to have some hairs between the two rods. Enable the retractions and then re-print the file again. The results of these two files give you the reason to adjust your retraction speed and retraction distance.
Make the adjustments until the two cylindrical rods appear clear without hairs between them.
The final retraction and stringing calibration test are the retraction calibration tool. The calibration tool is used to generate the appropriate G-Code as per the parameters used for the specific printer. It is recommended to begin with the default settings before adjusting the calibration tool. From this Ender 3 V2 review, you can tell that previous users have had an easy time calibrating the machine to produce the desired results.
Retraction Trusted Source Retraction | Definition of Retraction by Merriam-Webster Retraction definition is – an act of recanting; specifically : a statement made by one retracting. www.merriam-webster.com is a central aspect of 3D printing, and the different machines in the market have unique settings that you should understand if you want the best results. Bowden-type machines require a bigger retraction distance due to design elements that affect the other parts and, by extension, the functionality. 3D printers that feature the Bowden system place the extruder away from the hot end and utilize a PTFE tube to channel the filament. The tube leaves some allowance for the material to go through with ease, creating a looseness that must be compensated for by increasing the retraction distance. Direct extrusion systems, on the other hand, do not have this addition; hence the shrinkage is dealt with minus the extra tube. Some parameters that affect retraction vary for these two systems.
The filament type Trusted Source 3D printing filament - Wikipedia 3D printing filament is the thermoplastic feedstock for fused deposition modeling 3D printers. There are many types of filament available with different properties, requiring different temperatures to print. Filament is commonly available in the two standard diameters of 1.75 mm and 2.85 mm. 2.85 mm filament is sometimes erronously referred to as “3 mm”, but should not be confused with the less common filament size that actually measures 3 mm in diameter. en.wikipedia.org affects the retraction process in different ways. Other factors come into play for it to be a success, and material is among those that influence the outcome. When using a stable polymer like PLA, it is easier to control stringing by adjusting the retraction settings slightly. ABS has similar properties to PLA, but you have to be careful to ensure that it does not warp or crack during the process, as this will ruin the overall appearance of the print. Some materials like PETG require higher temperatures to melt, which encourages the formation of strings as it cools down. Choose the appropriate filament for the project you are printing to avoid the hassle of solving the stringing issue. If you use a diverse range of filaments for the projects you handle, consider getting a multi-functional printer like the Official Creality Ender 3 V2 Upgraded 3D printer. Reviews indicate that it has an effortless filament feeding part that will make your work more manageable.
Ender 3 retraction settings will vary from one project to another. When trying out a new unit, experiment with the default settings before adjusting anything to understand how the system works before you alter it. As you engage more with the 3D printer, you get to know what works for each project and the effects of the different parameters available. Manufacturers take into account the filament variations available and design printers to accommodate the varieties.
The 3D printer comes with a manual that will help you understand the functions available. Read through and familiarize yourself with the unit that you have before trying to print anything. If you are unsure of any of the parameters, contact the manufacturer’s customer service unit and get detailed information on the same. Expert reviews and client feedback will also help you get to know more about the Ender 3 retraction settings appropriate for your project.