3D printing has been around for quite a while now. Since its invention around 50 years ago Trusted Source History of 3D Printing - ScienceDirect Since its invention 50 years ago, 3D printing technology has progressed at a rapid pace, with significant impact in both the industrial and commercial world. Stereolithography, selective laser sintering, and fused deposition modeling were among the first widely successful methods of 3D printing, initially used for industrial prototyping. 3D printing technology was soon developed for use in a variety of fields, for large-scale manufacturing, engineering of highly complex parts, and even for personal use. www.sciencedirect.com , it has grown into a vast industry. Technology has advanced significantly over the years, and today, it is possible to create almost anything using it.
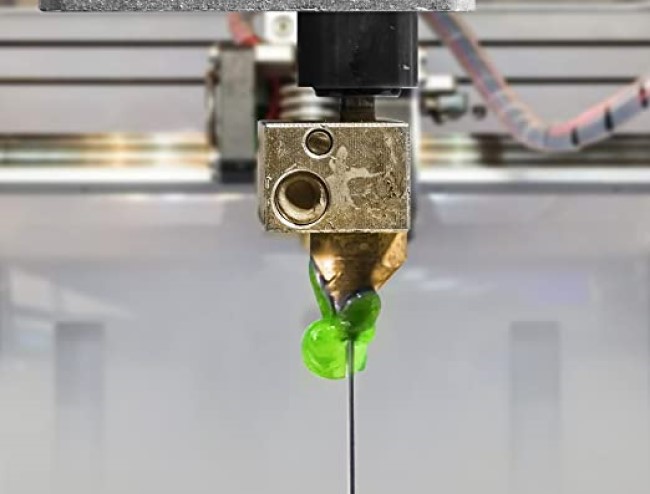
The most common type of 3D printer uses an extruder that heats plastic or other filament material that gets deposited layer by layer onto a build platform. The first printers were only able to produce simple shapes such as cubes. Thanks to layer height 3D printing technology, 3D printers can create much more complex designs like human faces and even full-sized working prosthetic limbs.
By the time you are done reading this write-up, you will have a good understanding of what layer height 3D printing is, how it affects your output resolution, strength, quality, printing time, and the best heights you can use in different scenarios.
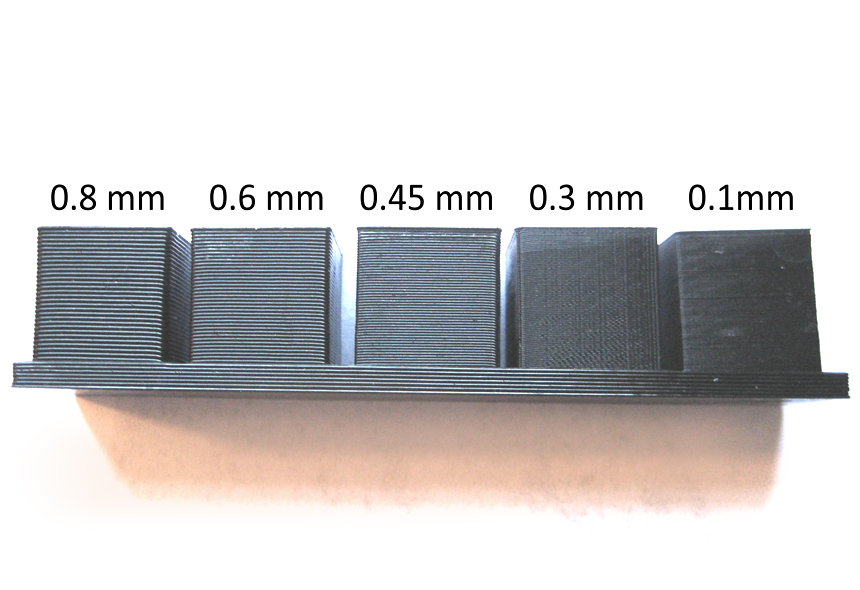
Layer Height refers to the distance between two consecutive layers in which ink/material is printed. Depending on the machine used, you can measure layer height in micrometers (µm), millimeters (mm), or any other measurement unit. For example, if you use a 0.2 mm nozzle with a 100 µm layer height, each layer would measure 20 µm thick.
The layer height measurements of a printout are directly affected by the diameter of your nozzle. The higher the diameter of your nozzle, the higher your layer heights will be.
On the other hand, layer thickness refers to the total amount of material your machine will add at a single point during printing. If you print a 10mm x 10mm square area with 1mm width, 5mm of material should be inside the box. If you want to make sure that every part of the object is covered evenly, you could increase the layer thickness so that no gaps remain.
Resolution refers to the smallest detail size that a 3D printer can produce. Simply put, the resolution in 3D printing indicates how accurately your 3D printer can print. You can also define resolution as the quality your printer can churn out.
The relationship between the three terms is that resolution is described in three dimensions: x, y, and Z.
3D printers have different resolutions, minimum layer heights, and layer thicknesses. You should purchase a printer that will meet your resolution requirements. If you are also considering versatility and ease of operation, you could go for the best ABS 3D printers, which can print virtually anything you desire.
There is no “best” layer height when it comes to 3D printing. Every situation requires different settings based on the desired outcome. A general rule of thumb is to start with low layer heights and gradually work towards high ones until you find the right balance.
If you don’t know where to begin, start with a thin layer height. It might look weird at first, but once you see the results, you’ll understand why. Increase the layer height slowly over time. Don’t jump from 50µm to 200µm without knowing precisely what you’re doing! Also, make sure the layer height you choose is between 25% to 75% of your nozzle diameter. If you use a 0.4mm nozzle diameter, your layer height cannot be lower than 0.1mm or higher than 0.3mm.
For prototyping needs, you should use the highest layer height setting possible. The output will not be your final build, so you do not need many details, quality, or precision. In such a scenario, you should also use less infill as possible to fasten the printing rate. It is worth noting that with faster printing, you will undoubtedly run into some problems. You may get a lot of ghosting, ringing, wrong dimension accuracy; previous layers might not have adequately solidified, and so forth.
You should only use more enormous layer heights if you need to print a more extensive project that requires less precision in less time. For such a print, you might want to opt for a giant machine. Bigger machines usually produce better results because they have greater capacity. They can handle large amounts of material and therefore allow you to create more intricate designs.
On the other hand, if you plan to print smaller items, you’ll probably get better results from a smaller printer and smaller layer heights. Smaller printers generally cost less but don’t provide excellent performance compared to their bigger counterparts. According to most reviews, the Official Creality Ender 3 3D Printer must be one of the best small 3D printers in the market. Despite the machine’s relatively small size, it has high precision and can print a project of up to 220x220x250mm dimensions.
Speed refers to the rate at which the printer prints objects. Generally speaking, this rate is affected by many factors. One of such factors that affect timing is the layer height.
If you print an object with smaller layer heights, it will take more time to print than one with more enormous layer heights. For instance, if you set your layer height to 100µm, your output will have more layers and take more time to complete a project. Setting layer height to 200µm would mean fewer layers, and hence it would take about half the time the first takes. As you know, the number of layers in an object determines its complexity. Complex builds have many internal structures, while simple ones only have a few. Therefore, complex designs will take longer to create than simpler ones.
Another factor that affects speed is the resolution of your print. The factor determines how detailed each part of your model or build will look. Higher resolutions result in smoother surfaces. On the other hand, if you do not detail your model adequately, it will have rough edges because your machine will print fewer details per unit area.
Setting the resolution too high will slow down the process since the printer needs to move slower than usual.
Printing with a lower layer thickness usually increases the print speed as well. Setting the layer thickness too high, on the other hand, will increase the amount of material used and the time spent finishing your project.
If you need a lightning-fast print, choose high layer heights and low layer thicknesses. With more enormous layer heights, your item will have few layers, and thus your printer will build it much faster.
Quality refers to the overall appearance of the final product. The best way to determine whether or not your 3D model is good-looking is to touch it with your hands. Is everything connected properly? How do they feel? Does it seem sturdy? These questions will help you assess the quality of your projects. Do not just look at your print; you can rarely distinguish between printouts with different layer heights by just looking at them.
To print a quality project, you need to set the layer height to as low as possible. The layer thicknesses and resolution should be higher. A lot also depends on the type of materials you choose. Some filament types require much finer layer heights, whereas others work fine even when using thick layers. You need to find the best materials available and master how to change Filament on Ender 3 to keep your print quality as high as possible.
To print at lightning speeds, you should set your machine to produce builds of a lower resolution. Your layer height should also be more extensive, and you should use a lower layer thickness. With such settings, the printout will be ductile and not of high quality. If you want to print quality 3D models at a higher speed, consider going for high-end models such as the Ender 5 Plus 3D printer, which can print at a relatively higher rate without affecting the quality.
Strength refers to the ability of the finished piece to withstand external forces. When designing your prints or builds, make sure that all parts are strong enough so that no matter how heavy or fragile the item may be, it won’t break apart easily. You could always add supports to your design to ensure its structural integrity.
A thin layer height combined with a higher layer thickness increases the strength and durability of your piece. For instance, an item printed with a layer height of 100 µm and a layer thickness of 20 µm is more robust and durable compared to one which has a layer height of 200 µm and a thickness of 10 µm.
To achieve maximum strength, you must go for thicker walls and stronger filaments.
To achieve the most diminutive layer height possible, so your piece is more robust, you need a printer that can 3D print in small layer heights. According to most user reviews, the best printer you can buy for strong printouts must be the Creality CR-10S FDM 3D Printer. The model can accommodate layer heights of as low as 0.1mm and as high as 0.4mm.
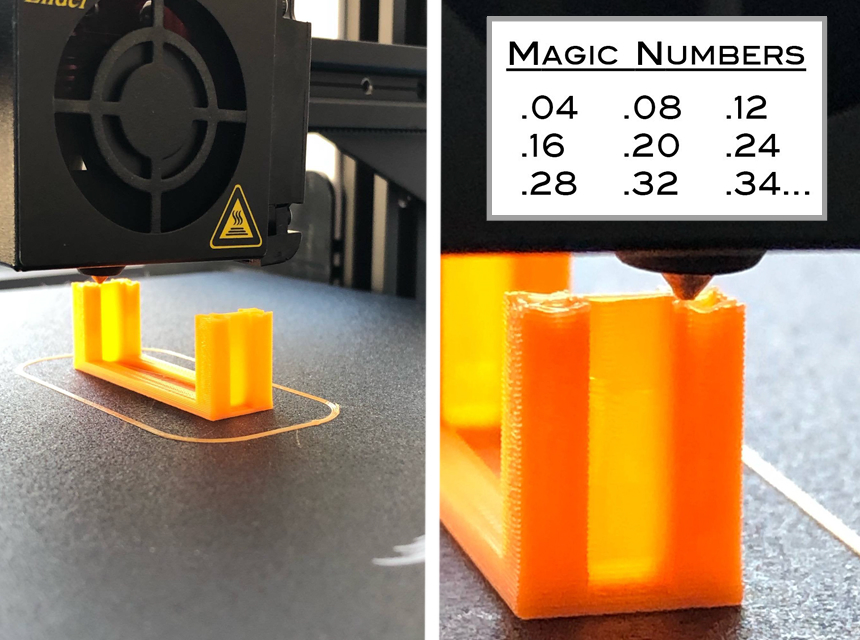
The odds are that you might have heard that every 3D printer has a “magic number” layer height. At this specific setting, the machine’s z-axis motor moves in steps that ensure it prints perfectly smooth surfaces.
For Ender 3 v2 3D printer and other related models with the same lead screw, such as the CR-2, the best prints are produced when the z-axis motor moves at steps of 0.04mm. To ensure that the printer moves at constant micro-steps of 0.04mm, you will need to set your layer height to a number divisible by 0.04, like 0.08mm or 0.12mm rather than 0.1mm.
Using these magic layer height numbers will make sure that your printer always makes equal steps. If your printer is making identical steps, your layer height will be the same throughout the print. A model consisting of layer heights of similar dimensions has smooth edges, looks nice, and has the best quality.
In simple terms, your stepper motor moves in either half or whole steps. You have to get those ‘magical’ layer height numbers that ensure your stepper z-axis motor will only take full or half micro-steps.
If you set your layer height so that your stepper has to take any steps between the two, several factors will determine the distances between the micro-steps, and your print quality might not be uniform.
If you have another model apart from the Ender 3, your magical layer heights will be different. To get the best optimal layer height for your printer, use the Prusa Printers calculator.
To use this online calculator, make sure you know the motor step angle of your printer, driver micro-stepping, leadscrew pitch in mm per revolution, pitch presets, and gear ratio. Just select the correct parameters that describe your printer, and the calculator will automatically display the optimal layer height settings for you.
As mentioned earlier, for the best prints, your layer height should not be less than 25% and more than 75% of your printer’s nozzle. For the standard 0.4mm diameter nozzle, it means that your layer height must be between 0.1 to 0.3mm. But since 0.1 and 0.3 are not multiples of 0.04, we recommend keeping the layer height to a minimum of 0.12mm and a maximum of 0.28mm for better Ender 3 prints.
If you need prints with a high resolution and quality, do not go any lower than 0.12mm when adjusting your layer height. For quick, low-quality printing, do not exceed a layer height of 0.28mm.
Also, if you have to pick any number between 0.12mm and 0.28mm, then make sure the number is divisible by 0.04. By using layer heights that are multiples of 0.04, your z-axis motor will only take half or full steps and not micro-steps, which would distort your print quality.
Despite smaller layer heights churning out robust, durable, and high-quality prints, they also have disadvantages.

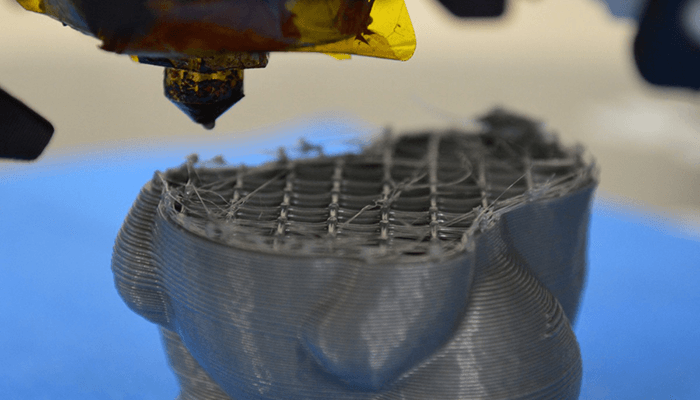
The first disadvantage is that small layers can cause warping due to insufficient support underneath them. Distortion occurs when material shrinks while 3D printing. The shrinkage causes corners of your print to bend upwards away from your build plates.
When plastics are heated, they expand and contract as they cool down. If you had used a thin material that shrinks too much, then your print will bend. Also, small layers tend to dry faster and require frequent retraction cycles because of their thinness.
To avoid this bending, we recommend using thicker layers at the bottom of your model, using an adhesive cot on your print surface, or using a heated building plate.
Another drawback of having thinner layers is that it increases the time required to print each part. When you decrease the layer height, it means your printer will have to print more layers than usual. Setting your printer to higher layer heights would print fewer layers and take less time.
Printing using smaller layer heights increases the overall time your printer will take to print your build. Hence, there is more time between which something might go wrong during the process. For instance, the supports could fail, the nozzle could be blocked, snapped filament, and so forth.
When you use more enormous layer heights, there is less time for any of the above things to happen or hinder your printing.
Thinner layer printing doesn’t always result in better builds. It can mess with your prints in the long run. When 3D printing in small layers or precision, expect your projects to have more imperfections than when you build in thicker layers.
Smaller layer heights mean that you’ll have to spend more time eliminating support materials. You may find yourself spending hours trying to get rid of those pesky support materials after every single print.
When you use a more considerable layer height, you will need fewer support materials. Once you dry your model thoroughly, you can take off the materials with much ease. Also, some larger layer height prints might not necessitate support materials.
When it comes to layer height 3d printing, there is no such thing as “one size fits all.” You should adjust your layer height according to your needs for optimal builds. If you want to build your project fast or print a prototype, go for higher layer heights. In such a scenario, print at 0.28mm for a 0.4mm nozzle diameter size.
We recommend printing at lower heights for your final design or any other project that requires extra precision and quality. For a printer with a 0.4mm nozzle, the optimum layer height for such a print would be 0.12mm.
If you do not know the specifics for your print, we recommend sticking to a 50%-layer height. In the case of a printer with a 0.4mm nozzle, your 50% value should be 0.2mm. The 50%-layer height 3d printing setting is a sweet spot for many printers in terms of both quality and speed.