Like all machines, 3D printers are prone to issues and operational errors too. While some of these issues cause serious or catastrophic problems to your project, other errors are minor and will only cause surface imperfections on your 3D prints. An example of such minor but equally important issue that is common in 3D printing is 3D printer zits and blobs.
When zits and blobs occur, you’ll still end up with solid 3D prints. However, the surface of your print will have minor blemishes caused by unwanted filament extrusions. Fortunately, fixing and preventing zits and blobs is relatively easy.
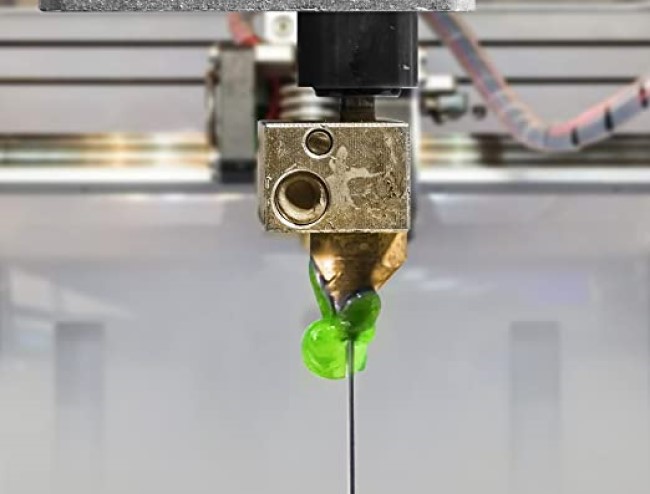
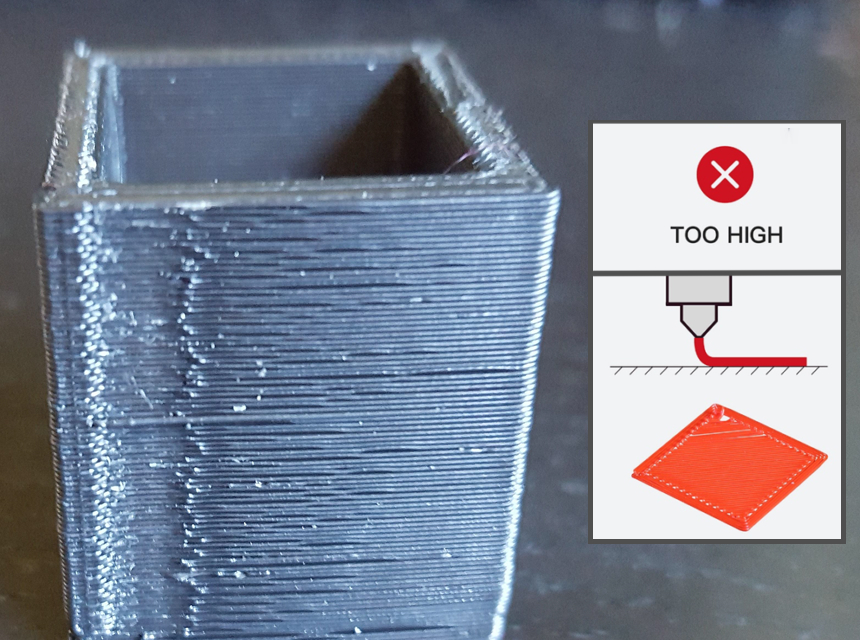
Zits or blobs are a form of surface imperfection that appear on the surface of 3D printed models. These blemishes often occur in the form of ridges, bumps, and surface accumulation on the print exterior.
Zits and blobs are surficial issues and are only visible on the part of the print. Still, it is an important issue to pay attention to since it has a major impact on the aesthetics of your print, especially for models where the visual presentation is important.
In some cases, zits and blobs can also cause functional issues. For instance, models that fit over each other or slot into each other may not fit perfectly due to these surface imperfections. It may also be an issue in models where dimensional accuracy is important.
Like all 3D printer issues, surface imperfection on 3D prints can be caused by different factors. In order to know how to prevent zits and blobs or correct them, we first have to understand the likely cause of these issues. Below, we have listed a few of the likely causes of zits and blobs in 3D prints.
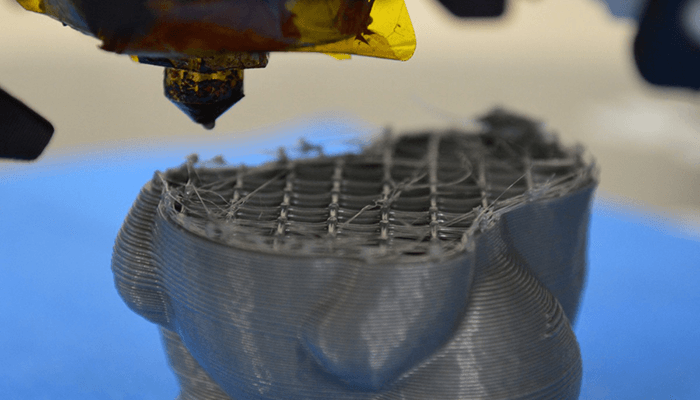
Zits and blobs are spots on your print where there’s excessive extrusion of the filament. If your prints are turning up too many surface blemishes, you should monitor the printer to identify where exactly the issue occurs. If the zits and blobs tend to appear at the starting or stopping point of a print layer, then the issue is likely caused by a burst of extra filament at this point.
One of the common causes of excess filament in unwanted points of your print is excess pressure on the extruder. This is somewhat connected to the previous point on the excess filament. This excess pressure can occur as a result of different factors such as Wrong printing speed, high temperature, or wrong retraction setting.
An excessively high printing speed is another common cause of blobs and zits on 3D prints. A high 3d printer zits acceleration will make it difficult for the extruder to keep up with the flow of the molten filament. This result is surface blemishes due to the excess pressure on the extruder. The ideal speed for your printer varies based on the type of 3D filament Trusted Source 3D printing filament - Wikipedia There are many types of filament available with different properties, requiring different temperatures to print. en.wikipedia.org and other factors. However, you should follow the manufacturer’s recommendations and only adjust the speed settings when necessary.
The extruder pathing is responsible for how the printer nozzle travels during an empty run. The setting of the extruder pathing prevents unnecessary retraction, and wrong extruder pathing causes heavy retraction, which increases the chances of ending up with zits and blobs. You can either stop it entirely or reduce the number of filament retractions to a minimum. You can use the “Retract only when crossing open spaces” on your slicer to correct this. This feature prevents retraction when the print head moves across internal spaces. This ensures that surface imperfections are no longer visible on the print surface. Note that the exact wording of this feature may vary in different slicer software products.
The retraction setting is one of the major factors that influence the occurrence of blobs and zits. Generally, your printer should only retract when it is absolutely necessary. Avoiding retraction ensures that you always get a continuous filament extrusion. This is even more important for printers with a Bowden extruder setup where the extra distance between the nozzle and the extruder can be problematic. In any case, if retraction is necessary at all, you must ensure that the settings are right.
The retraction speed is also quite important. This refers to how quickly the extruder pulls back the filament. The speed must not be too fast or too slow, or you may end up with zits, blobs, strings, and other printing issues. The minimum retraction speed recommended is about 20 millimeters per second. However, in some cases, the speed can be increased to as much as 100 millimeters per second. Finding the right speed is crucial to avoiding surface imperfection.
The coating setting is another vital parameter that can affect your print quality. This setting stops the extrusion right before the end of a layer. This prevents a build-up of pressure that causes the appearance of zits at the point where the filament layer terminates.
Wiping is similar to coasting but with a slight variation. Both the coasting and wiping settings help to refine the volume of filament extruded by controlling nozzle pressure. Wiping adds to the already extruded filament instead of releasing pressure at an empty spot. This helps to address the issue of under-extrusion at the termination point of the print layer.
Since there are different possible causes of 3D printing complications, the right method for fixing it will depend on the exact cause. It is possible to get rid of zits and blobs post-processing using a 3D print tool kit with the right cleaning and finishing tools. However, by identifying the source of the problem and fixing it entirely, you can prevent zits and blobs from appearing on the model in the first place and get a model that is aesthetically perfect as possible. Here are a few tweaks that you can use to get rid of zits and blobs.
Extrusion is one of the likely major causes of printing issues in 3D models. Printing issues occur when the machine is not extruding material in the right amount or is extruding material inconsistently. Thus, if you’re experiencing zits and blobs in your model, extrusion should be one of the first settings to tweak.
Start by calibrating your printer’s extruder if you have not done so already. If the printer is already calibrated, you should check the extrusion multiplier to ensure the flow is correctly set. This setting determines how much filament the printer extrudes.
Sometimes, extrusion issues can be caused by hardware issues such as clogged or unclean nozzles. Simply cleaning or changing the nozzle should fix the issue in this case.
As mentioned, excessively high speed and temperature are likely causes of inconsistencies in printing output. If the printing temperature is too high, you end up with over extrusion of materials. Similarly, if the printing speed is too high, there will be less time for old material to settle before new layers are added on top. Therefore, adjusting the nozzle speed and temperature can be quite helpful for solving printer extrusion issues.
Another simple fix that may help prevent zits and blobs is to adjust the retraction settings of your printer. The retraction controls how the extruder pulls back the filament in order to prevent pressure build-up from causing material extrusion. The wrong distance, speed, and frequency of retraction can cause zits and blobs to appear. Adjusting the following retraction settings may help prevent surface inconsistencies:
One of the ways to avoid retraction issues is to increase the minimum retraction travel distance of your slicer. This refers to the smallest distance the nozzle travels before retraction occurs. Adjusting this parameter will reduce how often retractions occur and limit the occurrence of surface blemishes.
Another way to tune the machine’s retraction in order to prevent zits and blobs is to adjust the retraction distance. This setting controls how much filament the machine pulls back every time a retraction occurs. If the retraction distance is low, not enough material will be sucked back during a retraction, and the excess filament will end up on the model, causing zits and blobs. Conversely, issues will also arise if the retraction distance is too high. Hence, you must find the sweet spot by adjusting the retraction distance as necessary.
The retraction speed setting controls how fast the filament is pulled back when a retraction occurs and how quickly it is released when it ends. Excess material will end up on the model if the pullback is not fast enough, causing blobs and zits on the print. Adjust the retraction speed until you find an ideal point for your machine.
Excessively high nozzle temperature is one of the major causes of over extrusion on the model surface. When the temperature is too high, the filament will stay melted for too long and this can give rise to zits and bobs. One of the ways to prevent this is by putting measures in place to lower the temperature of the nozzle.
The shell settings of your 3D printer control how the exterior parts of your models are printed. Therefore, adjusting this setting is an effective way to prevent surface problems like blobs and zits from appearing on the model surface. Some of the shell settings parameters you can adjust include:
Since the hot end of the nozzle extrudes the filament material is under pressure, the nozzle will continue to release material even after it has stopped moving. The purpose of the coasting setting is to prevent this. It effectively stops the printer from extruding material a small distance before the point of termination of the print. This prevents over extrusion, which is one of the main causes of zits and blobs on prints. You can activate the coating feature and adjust it accordingly to prevent over-extrusion.
When printing, you should ensure that the filament is not saturated with moisture as this can lead to a wide range of quality issues with your print, including surface imperfections. Additionally, wet filaments can damage the internal components of your machine.
If you notice a hissing and popping sound for the extruder when the filament goes in, then there’s most likely moisture on the filament. The hissing sounds you hear are caused by the moisture evaporating from the filament. If you discover that your filament is wet, you should stop printing entirely and start over with dry filament.
The evaporating moisture will cause residues to form within the heating block. Over time, a continuous build-up of residue will clog the nozzle and lead to pressure build-up in the extruder, making it difficult to achieve uniform prints.
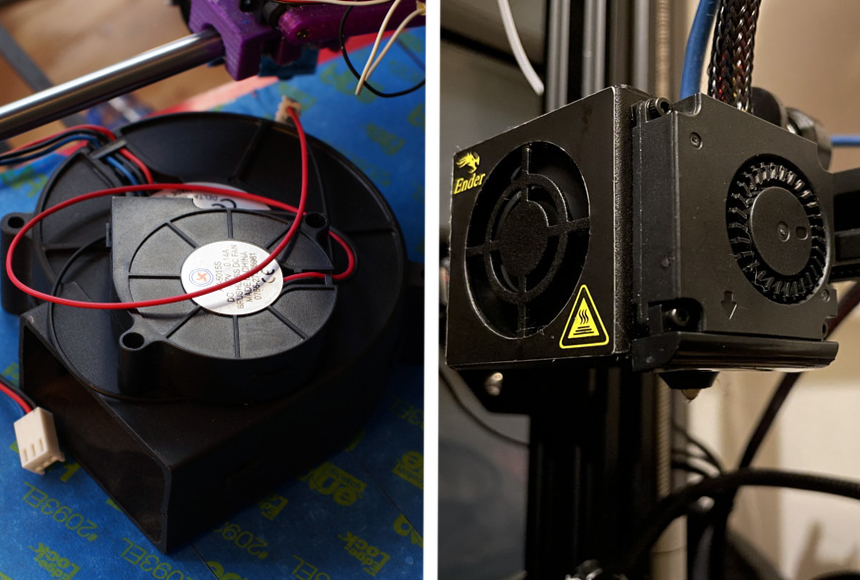
The measures covered so far are most software settings that you can adjust in your machine to prevent surface blemishes from occurring. The following are some simple hardware changes that can also affect print quality and some tips that can help prevent zits and blobs during printing.
As explained above, the presence of residue on your nozzle can impede normal extrusions. Residue build-up can be caused by a wet filament or the accumulation of dirt in the nozzle. These residues can clog the nozzle, causing pressure build-up. This affects your printer’s output quality, leading to 3d printer abs small balls zits. Therefore, it’s good practice to schedule regular cleaning for your machine to get rid of such residue build-up and prevent zits and blobs.
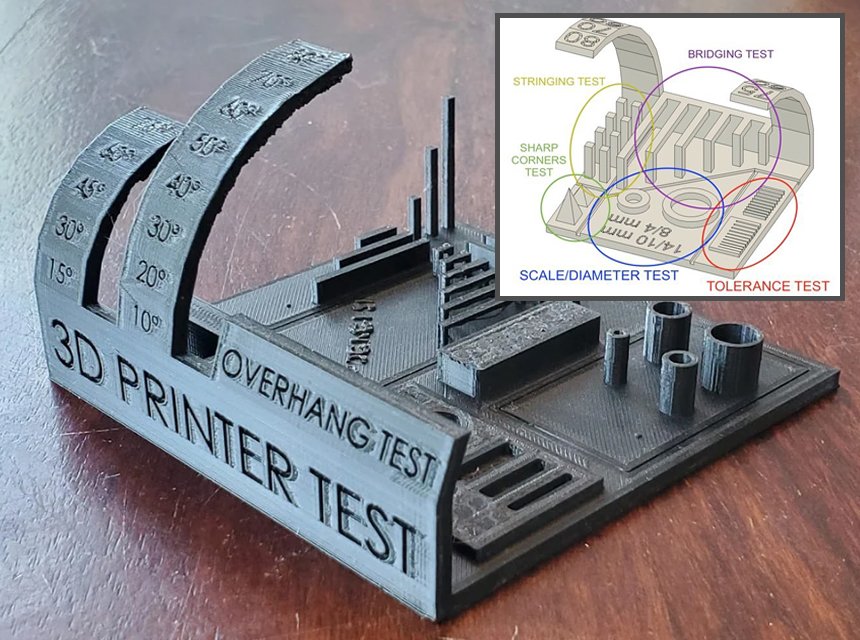
Even after following all of these recommendations and ensuring your print surface is secured with a bed weld, it is still possible that your 3D prints end up with surface imperfections. This is why doing a test print first is often recommended especially when you’re working on a massive project. To avoid wasting your time and printing materials, you should do a test print first of a small but detailed model. This is a sort of calibration print that can be used to verify that your settings are right and your machine is in perfect working condition before you begin printing your actual models.
Most 3D printing machines do a good job of producing uniform model layers. However, due to problems with the extruder settings, and some hardware issues, you may end up with a model with surface defects such as zits and blobs.
Fortunately, 3d printer zits and blobs are very common 3D printing defects, and fixing them is easy as well. You can prevent them by adjusting some of the settings highlighted above and maintaining your machine hardware in the right condition. There are some
post-processing techniques for getting rid of surface defects
Trusted Source
Pre and post processing techniques to improve surface characteristics of FDM parts: a state of art review and future applications
| Emerald Insight
Pre and post-processing techniques to improve surface characteristics of FDM parts: a state of art review and future applications.
www.emerald.com
too. By following these tips, you should be able to produce good-quality models that are relatively perfect in terms of aesthetics and performance.